Migrate OS to SSD with EaseUS Partition Master
OS migration refers to transferring the Windows, along with its required boot partitions, system files, installed applications, and configuration from one storage device to another.
Migrating OS to an SSD is one of the most effective ways to upgrade a Windows computer without replacing the entire machine. Whether you want to improve boot speed, replace an old hard drive without reinstalling Windows, or move your OS from a smaller SSD to a larger one, OS migration can help.
This guide explains why migrating OS to SSD makes sense, when it’s the right choice, and how to complete the process safely using either migration software or a clean reinstall.
Why Migrate OS to SSD
Many users are experiencing slow boot times, system lags, or disk warnings. In most cases, the problem is not the processor or memory; it’s the storage device. Traditional hard drives rely on spinning platters and mechanical read/write heads, which inevitably limit performance and increase wear over time. Migrating your operating system to an SSD addresses the bottleneck directly, without requiring a complete system rebuild.
EaseUS
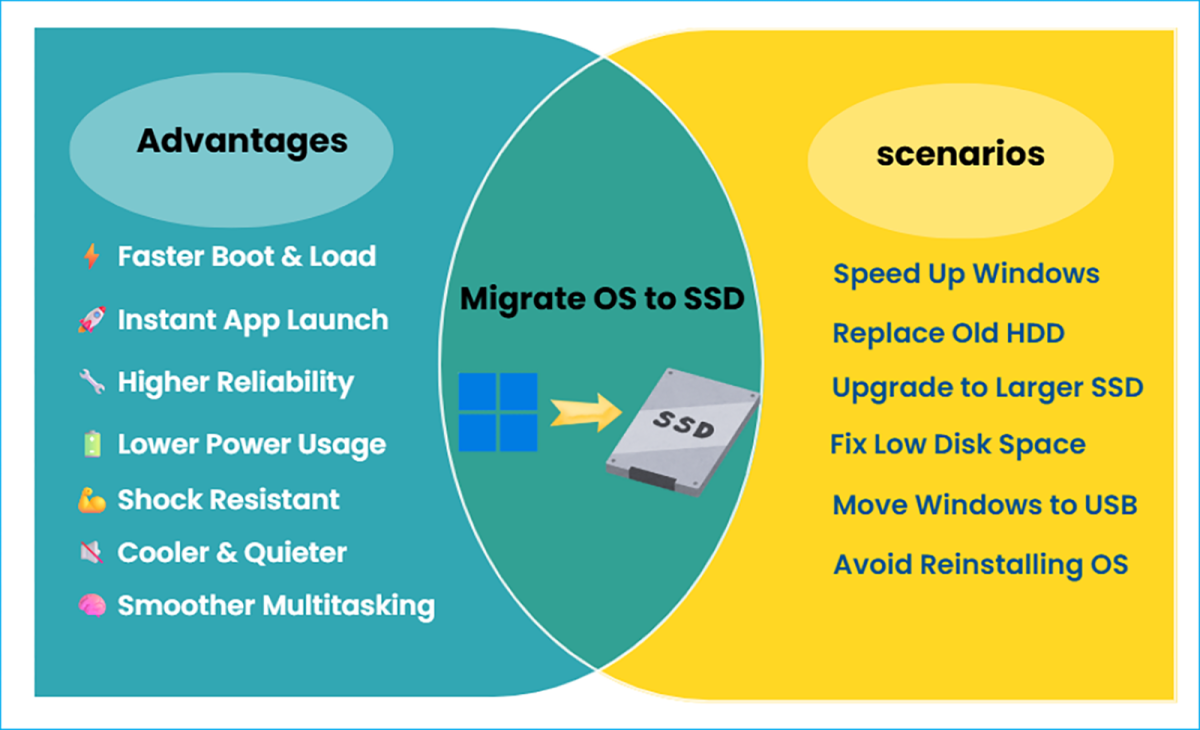
Benefits of Migrating OS to an SSD
Switching from an HDD to an SSD offers measurable performance and reliability improvements:
- Significantly faster data access speeds, reducing boot time and application loading delays
- Higher reliability, as SSDs contain no moving mechanical components
- Lower power consumption, extending laptop battery life
- Better shock resistance, minimizing the risk of physical damage
- Reduced noise and heat generation
- Improved multitasking responsiveness, especially during updates and background processes
When OS Migration Is the Right Solution
Migrating your Windows OS to an SSD is particularly useful in the following scenarios:
- You want faster startup and overall system performance.
- You need to replace a failing or outdated hard drive without reinstalling Windows.
- You are upgrading from a smaller SSD to a larger SSD due to insufficient disk space.
- You want to migrate Windows to a USB drive for portability, testing, or recovery.
In each case, OS migration minimizes downtime while preserving your current system environment.
How to Migrate Windows to SSD
How to migrate OS from HDD to SSD? There are two main ways to migrate an operating system to an SSD. The first method uses an OS migration tool to copy Windows from HDD to SSD without reinstalling. The second method involves reinstalling Windows directly onto the SSD.
So what’s the best way to transfer os to SSD? Both approaches are valid, but they differ in time, complexity, and risk. Below, let’s walk through each method.
Method 1. Migrate OS to SSD Without Reinstalling
Using a professional system migration tool is the fastest way to transfer Windows to an SSD without losing data or reinstalling applications. This approach is ideal for users who want a seamless upgrade with minimal disruption. EaseUS Partition Master allows users to move an entire operating system disk, including system files, installed programs, user data, and system settings, to an SSD in just a few clicks.
Key Features
- Supports migrating Windows to an SSD or HDD smaller than the original system disk
- Transfers all system-related partitions and optional data partitions
- Allows OS migration within Windows or via WinPE environment
- Lets users configure automatic boot from the target disk after migration
- Provides manual UEFI boot entry configuration
- Supports BIOS and UEFI boot modes, as well as MBR and GPT disks
- Compatible with Windows 11/10/8/7/XP/Vista
Before starting the migration, proper preparation is essential to prevent data loss or boot issues.
Step 1. Prepare for Transferring OS to SSD
Because the operating system controls startup and system integrity, any migration must be handled carefully. Incorrect partition layout, mismatched boot mode (UEFI vs BIOS), or disk format conflicts (MBR vs GPT) can result in boot failure.
1️⃣Back up your data
Create a full backup of important files and system data from both the source disk and the target SSD.
2️⃣Clean the source system disk
Uninstall unused applications and delete unnecessary files, which reduces migration size and avoids transferring redundant data.
3️⃣Prepare the target SSD
- Ensure the SSD has enough capacity to store all Windows-related partitions
- Properly connect or install the SSD so Windows can detect it
- Be aware that OS migration will erase all existing data on the target SSD, back up first
- If the SSD is new, initialize the SSD correctly: Use MBR for legacy BIOS systems; use GPT for UEFI systems. Incorrect initialization may cause boot failure after migration.
4️⃣Install OS Migration Software
EaseUS Partition Master can migrate Windows 11/10/8/7/XP/Vista to internal SSDs, external drives, USB flash drives, or even virtual machines. It supports all types of SSDs, including SATA SSD, M.2 SSD, NVMe SSD, and large-capacity hard disk drives.
Step 2. Migrate OS to SSD
Now, it’s time to move Windows to an SSD with EaseUS Partition Master.
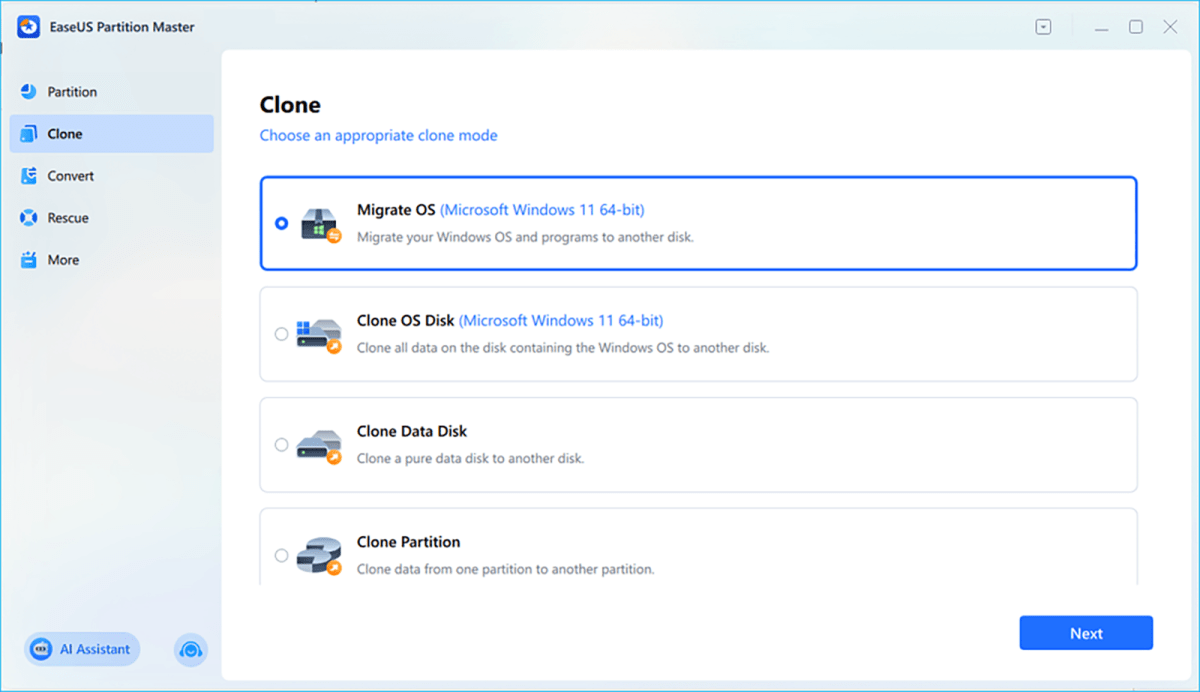
1️⃣Launch OS Migration Software
Launch EaseUS Partition Master, go to the Clone section, click “Migrate OS”, and click “Next” to continue.
EaseUS
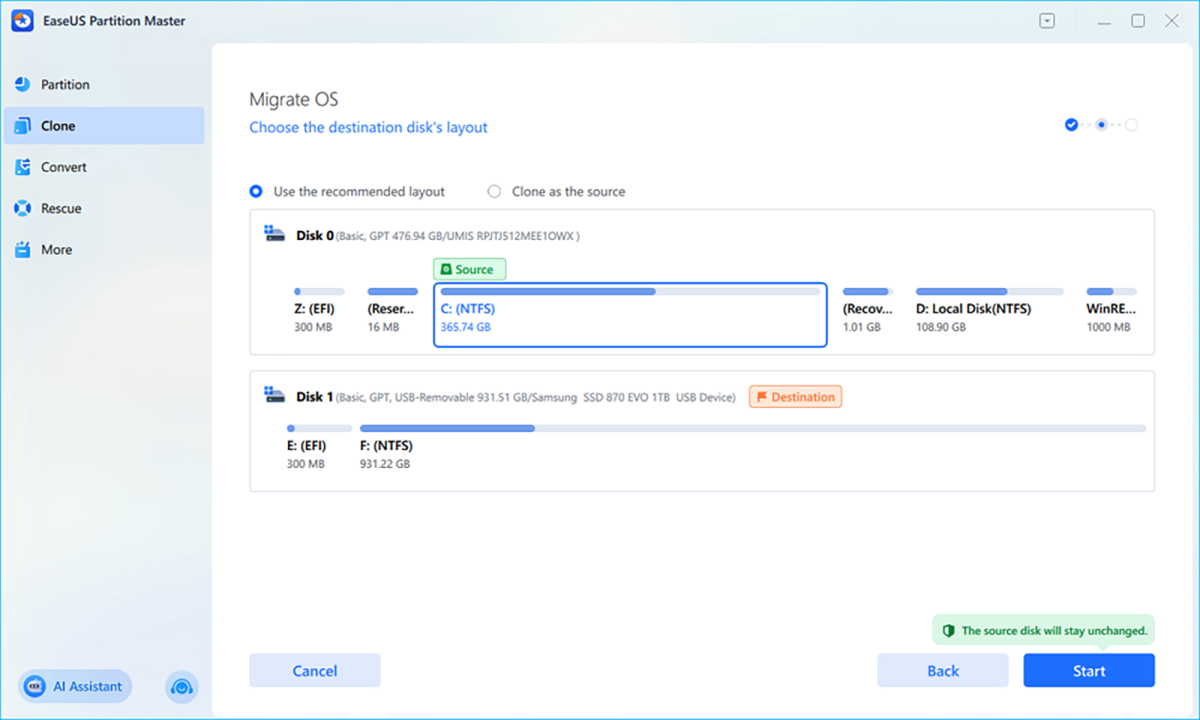
2️⃣Select the SSD as the Destination Drive
Select the NVMe/SATA SSD you want to move Windows OS to, and click “Next”. Then, click “Yes” to confirm that you want to move OS to another drive.
EaseUS
3️⃣Start OS Migration
Click “Start” to migrate Windows to the new SSD. And wait for it to complete. During the process, don’t exit the OS migration tool or power off your laptop.
Step 3. Boot From the SSD
After migration completes, configure the system to boot from the SSD.
1️⃣Restart the computer and press the BIOS key (typically F2 repeatedly to enter BIOS or UEFI settings.
2️⃣Navigate to the Boot Order tab.
- On legacy BIOS systems, set the SSD as the first boot device.
- On UEFI systems, select the SSD as the primary boot drive.
3️⃣Save changes and exit BIOS. The computer should now boot from the SSD, while the old hard drive becomes secondary storage.
Once booted successfully, verify that:
- Windows version and settings match the original configuration
- SSD partitions are correctly configured in Disk Management
- Important files and applications function normally
✅ If you see an “Activate Windows” message after rebooting, do not worry. Replacing the system disk may trigger license verification. Follow Microsoft’s official activation instructions to reactivate Windows.
Method 2. Migrate OS to SSD via Reinstalling
If you prefer a completely clean system environment, reinstalling Windows directly onto the SSD is another option. This method removes previous configuration issues but requires reinstalling applications and restoring files manually.
🚩Because this process erases the target SSD entirely, backing up important data beforehand is critical.
Step 1. Make Full Preparations
Before reinstalling Windows, prepare the following:
- Windows ISO image or official Windows installation media
- USB storage device (64GB or larger, empty, formatted as FAT32)
- SSD (64GB or larger; gamers may prefer 500GB, 1TB, or more)
- A Windows PC and valid Windows activation key
Having these components ready ensures a smoother installation process.
Step 2. Prepare Windows Installation Media
Here, I’ll use Windows 11 as an example:
- Download the official Windows 11 Media Creation Tool from Microsoft’s website.
- Click and run the tool, then select USB as the target device, and follow the on-screen instructions to create a bootable USB installation drive.
Step 3. Boot from the USB Installation Media
- Insert the bootable USB drive and restart your computer.
- During the restart, press F2/F10/F12/Del key to enter BIOS/UEFI settings.
- Set the USB drive as the first boot device > Save changes and exit BIOS.
If Secure Boot or boot mode settings are misconfigured, installation may fail. Verify compatibility before continuing.
Step 4. Install Windows on the SSD
Your PC will automatically boot from the Windows installation USB after changing the boot order.
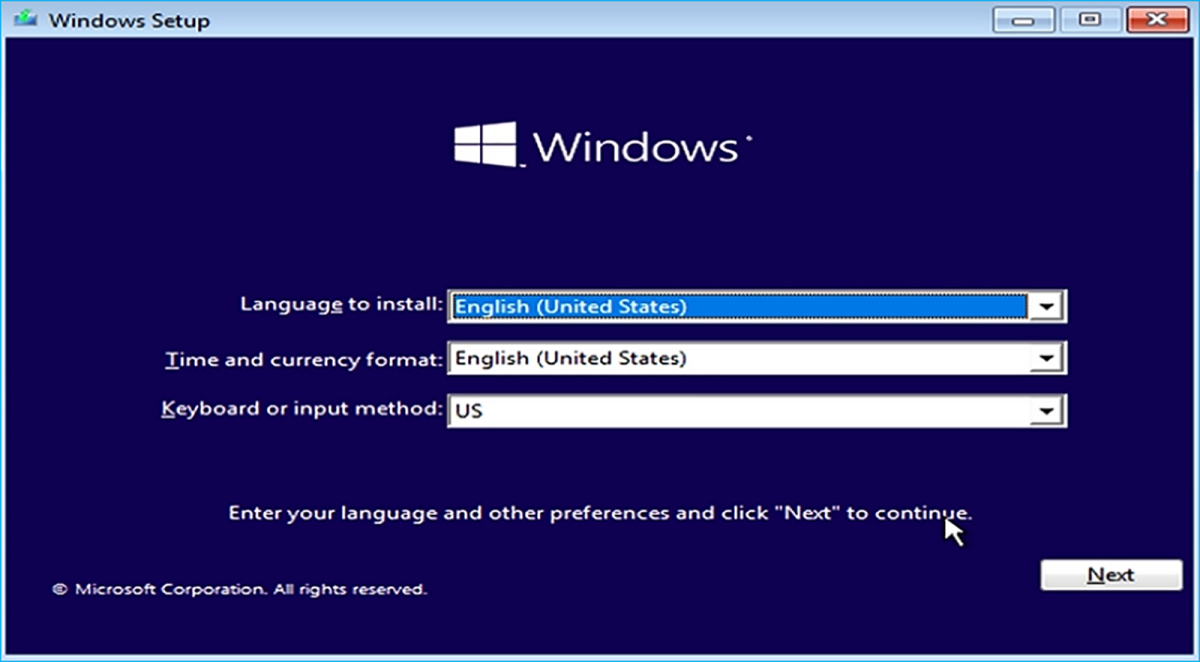
- Once the Windows setup screen appears, select the correct language and click “Next”.
EaseUS
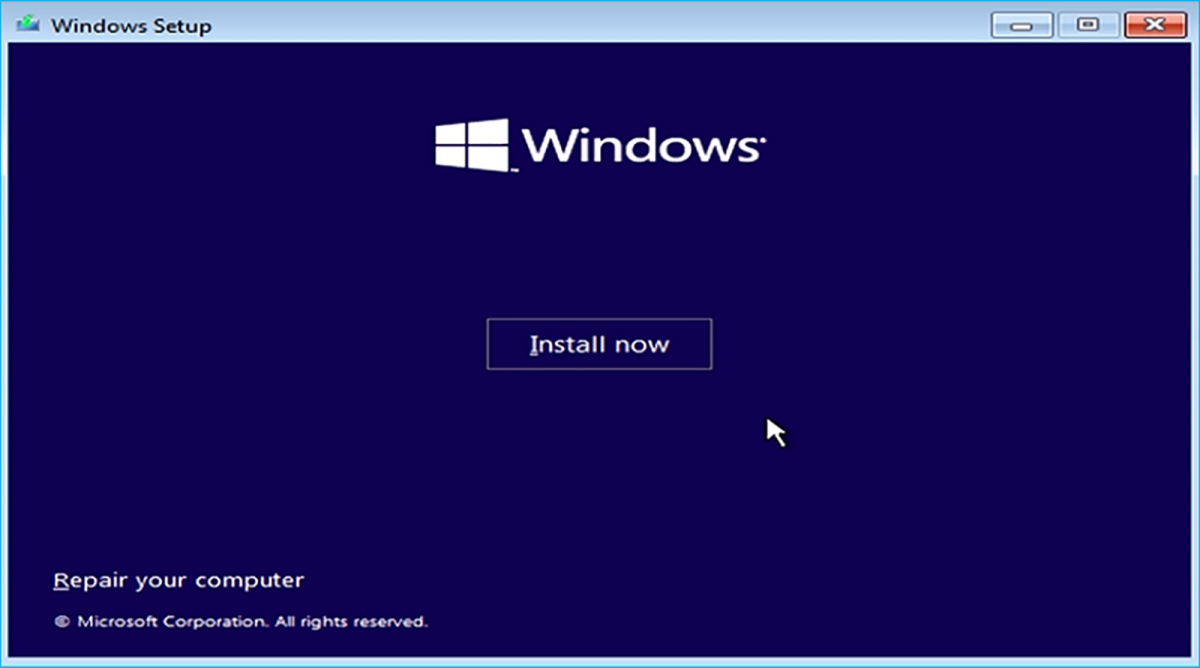
- Then, click “Install Now”.
EaseUS
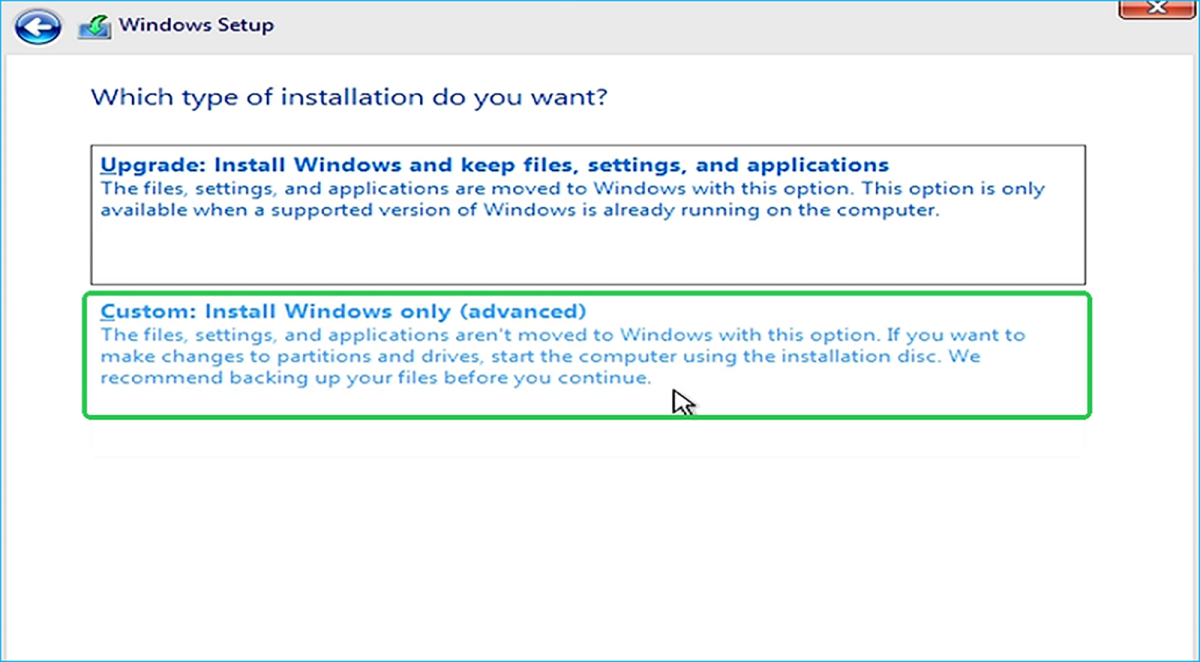
- Select the proper Windows version, and click “I don’t have a product key” to skip the Windows Activation step.
- Choose “Custom: Install Windows only (advanced)”.
EaseUS
- Choose the target SSD and proceed with installation. Delete existing partitions if necessary to ensure a clean install.
After installation completes, reinstall drivers and applications, and restore your backed-up files.
Conclusion
Migrating OS to SSD is one of the most effective ways to improve system speed, reliability, and responsiveness. Whether you choose to migrate/clone Windows to SSD without reinstalling or perform a clean installation, careful preparation is essential to avoid boot errors or data loss.
For users seeking a fast upgrade with minimal disruption, OS migration software provides a streamlined solution. For those wanting a fresh start, reinstalling Windows may be the better option.
FAQs About OS Migration
What is OS migration?
OS migration is the process of transferring a Windows operating system and its required boot partitions from one drive to another, typically from HDD to SSD, without reinstalling Windows or reconfiguring applications.
Can I migrate Windows to a smaller SSD?
Yes, as long as the SSD has enough space for all system-related partitions. Cleaning unnecessary files before migration may help migrate Windows to a smaller SSD.
Will I lose data during OS migration?
No, if you use professional OS migration tools, you won’t lose data during the OS migration, but creating a full backup before migrating is strongly recommended.
Why won’t my SSD boot after migration?
Common causes include incorrect boot mode (UEFI vs BIOS), mismatched partition style (MBR vs GPT), or missing system partitions. Adjusting BIOS settings or repairing boot records usually resolves the issue.
Is it better to clone Windows or reinstall it?
Cloning saves time and preserves applications and settings. Reinstalling provides a clean system environment but requires reinstalling programs and restoring files manually. The best method depends on your needs and system condition.
This articles is written by : Nermeen Nabil Khear Abdelmalak
All rights reserved to : USAGOLDMIES . www.usagoldmines.com
You can Enjoy surfing our website categories and read more content in many fields you may like .
Why USAGoldMines ?
USAGoldMines is a comprehensive website offering the latest in financial, crypto, and technical news. With specialized sections for each category, it provides readers with up-to-date market insights, investment trends, and technological advancements, making it a valuable resource for investors and enthusiasts in the fast-paced financial world.