
The notorious “Blue Screen of Death” — or BSOD for short — is the biggest disaster that can befall a Windows user. The system shuts down with a cryptic error message on a blue background and is only ready for use again after a restart.
Unsaved data is lost. After the restart, Windows runs for a while until the error occurs again. In some instances, the BSOD can re-occur immediately and perpetually every time Windows is started. The system is then unusable and repairs are only possible via a second or rescue system.
This article shows several ways to access a system that no longer shows a desktop.
The causes of the complete crash are varied and not always easy to discern. We describe how the error can be investigated in more detail and what measures can be used to repair a defective Windows system.
1. Why a blue screen occurs
A Windows system crash with a blue screen is always due to a driver or the hardware.
It can also be a driver that is not directly related to the hardware, such as a virus scanner component. Drivers run in a privileged mode and have direct access to main memory areas and hardware interfaces.
If a serious, unavoidable problem occurs, the system is stopped with a stop error to prevent damage, for example to the file system. In such cases, the Windows kernel displays an error message on a blue background with white text — known as a blue screen. The system is then restarted automatically.
In some cases, the message contains the name of the driver that caused the crash. While drivers that are supplied with Windows are rarely affected, such errors occur more frequently with subsequently installed third-party drivers. This can happen immediately after installing a new driver or after an update.
Changes made by Windows updates can also lead to a crash, especially if important system functions are customized. An incompatible driver that cannot cope with these changes can then work incorrectly and bring the system to a standstill.
The blue screen often only displays a general error message that cannot be assigned to an individual driver (see point 11). An error code is also displayed, which can help to analyse the problem.
See also: Deep clean your Windows PC: 10 professional tricks and tools
2. Prevent restart
By default, Windows is configured so that the blue screen only appears very briefly and is barely legible. To keep the message visible for longer, adjust the configuration. You should take this preventive measure with every Windows system to be prepared for problems.
If Windows still starts and only crashes after some time, call up the “Settings” (Win-I) and go to “System > About” (otherwise continue reading in point 3). Click on “Advanced system settings.”
You will find the link in Windows 11 behind “Related links” under “Device specifications,” in Windows 10 on the right-hand side of the window under “Related settings.” The “System properties” window opens. (A quick way to get here is via the “Run” dialogue (Win-R): Type SystemPropertiesAdvanced and confirm with “OK.”
In the “System Properties” window, go to the “Advanced” tab and click on the “Settings” button under “Startup and Recovery.” Remove the tick next to “Perform automatic restart.”
Under “Save debug information,” select “Small memory image (256KB).” In the event of a crash, a file with the extension “.dmp” is now created in the folder “C:WindowsMinidump,” which can be analyzed later (see point 13).

Display errors: Deactivate “Automatic restart.” Otherwise the blue screen will only appear briefly and you will usually not be able to read the error message.
Foundry
3. Fix problems with on-board tools
If Windows crashes repeatedly and shortly after starting with a blue screen, you cannot change the setting as described in point 2. However, Windows has set up a minimal Windows on a separate partition (WinRE, Windows Recovery Environment) during installation on the hard drive, which you can use for repairs.
If access to WinRE fails, continue reading in point 5.
To access the repair system: Switch on the computer using the power button, wait briefly until the Windows logo appears and Windows starts to load. Switch the PC off again by holding down the power button a little longer.
Repeat the process several times until Windows starts the automatic repair. This is usually the case after three false starts. You can recognize the mode by the message “Automatic repair is being prepared.”
Windows will attempt an automatic repair and there are two options once it is complete: The system restarts on its own and you find yourself in the same situation as before.
In this case, switch the PC on and off again repeatedly until the automatic repair starts. After several attempts, “The PC did not start correctly” appears with the “Advanced options” button. However, it is also possible that this button is already visible after the first auto-repair.
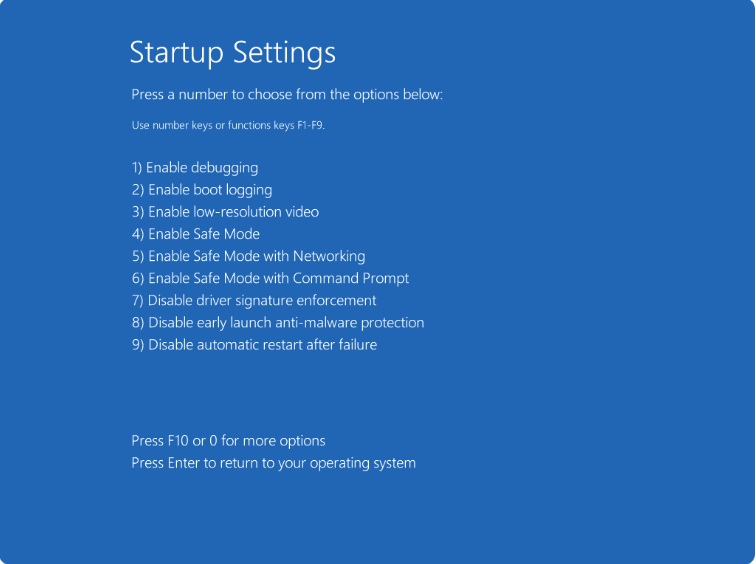
After clicking on “Advanced options,” go to “Troubleshooting > Advanced options > Startup settings” and click on “Restart.” The “Advanced startup options” menu appears, in which you use the arrow keys to select “Disable automatic restart after failure” and confirm with the Enter key.
Windows will now not restart automatically in the event of a blue screen and you can read the messages. You can also use the menu to start Windows in safe mode, which can be used to rectify errors (see point 8).
Important note: If you have encrypted the system partition with Bitlocker, you must have the recovery key ready and enter it when you are asked for it. You saved the key when you activated the encryption.
This applies to this tip, but also basically to all accesses to the installed system, which we describe in the following points. It does not matter whether you start a rescue system from the hard drive or a USB stick.
Foundry
4. Advanced start options
In previous versions of Windows, you could use the F8 key to call up the advanced start options or safe mode. This no longer works with Windows 10 and 11.
Due to the fast start mode, Windows starts so quickly, especially from SSDs, that it is almost impossible to find the right time to press the F8 key. Microsoft has therefore decided to no longer query the key at all. However, if you want to be prepared for an emergency, you can change this. The trick is to reactivate the menu of the classic boot manager.
To do this, use the tool Bootice tool, which you unzip and then start the file BOOTICEx64_2016.06.17_v1.3.4.0.exe.
Step 1: Go to the “BCD” tab and click on “Easy mode.” The option “BCD of current system” must be activated.
Step 2: After clicking on “Add,” create a new boot entry with the name “Windows secured.” Customize the options so that they correspond to those of the existing entry for Windows 10 or 11.
Step 3: Deviating from this, select the entry “Safe Mode w/ Network” after “SafeBoot:”. Click on “Save current system.”
Step 4: For both boot menu entries, remove the tick in front of “Metro Boot Manager (Win8)” and click on “Save current system.” Under “Global settings,” tick “Display boot menu” and click on “Save global settings.”
When you restart Windows, the classic boot menu appears on a black background. Press the F8 key to access the menu with the advanced boot options: “Repair computer” (WinRE), “Safe mode,” “Disable automatic restart in case of system errors”.
Or you can directly select the new entry “Windows secured” in the boot menu.
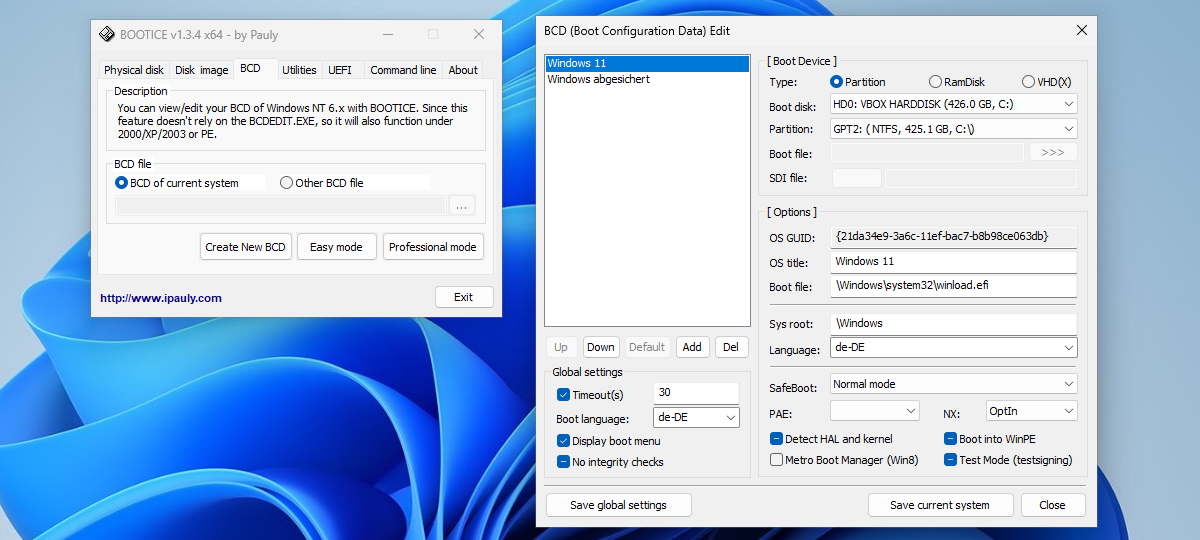
Edit boot menu: Use the Bootice tool to add new entries to the Windows boot menu, for example for safe mode.
IDG
5. Start repair system
Defects in the file system, an incorrectly configured boot manager or dysfunctional drivers can prevent the automatic repair from starting and the “boot settings” from being called up (see point 3). You should therefore always have a rescue system ready for system repairs.
Ideally, you already have one if you have installed Windows yourself from a USB stick. If not, create a USB stick for the Windows installation on another PC, which also contains repair tools.
To do this, use the Microsoft Media Creation Tool for Windows 10 or for Windows 11. Alternatively, download the ISO file for Windows 11 directly (under the heading “Download Windows 11 drive image (ISO) for x64 devices”) and create the USB stick with Rufus. The system can also be used to repair Windows 10.
Reading tip: 10 things I’d never, ever do as an IT professional
If you are using a Windows 10 ISO or Windows 11 prior to version 24H2, proceed as follows:
Step 1: Boot the PC from the installation stick. You may need to change the boot sequence in the firmware/BIOS setup under “Adjust the boot sequence.” When starting, the message “Press any key to boot from CD or DVD” appears. Press any key to activate the start of the USB stick.
Step 2: Click on the “Next” button and then on “Computer repair options.”
Step 3: Go to “Troubleshooting” and then to “Startup help.” Select the target operating system and wait for the startup repair to complete. Click on “Shut down” and switch the PC back on.
Windows should now start again from the hard drive, but this measure does not usually resolve the cause of the blue screen. However, the repair system offers further options for repairs (see points 6 and 8).
Windows 11: Since Windows 11 version 24H2, the setup tool looks slightly different. It greets you with the “Select language settings” window and you click on “Next.” You can then adjust the keyboard settings if required and click “Next.” Then select the “Repair my PC” option and click “Next.”
On the next screen, click on your preferred language for the keyboard layout. Then continue with “Troubleshooting” and “Startup help” as described in step 3 above.
Tip: “Computer repair options” or “Repair my PC” only provide a few tools. A self-created Windows rescue system offers significantly more options.
It starts from the USB stick and can be operated in almost the same way as you are used to with Windows. You can use the system for repairs, but also for data recovery and searching for malware, for example.
Using the rescue system: The system starts from the installation medium and offers a “Startup help” option that can be used to resolve some startup problems.
Microsoft
6. Deactivate auto restart
The installation and repair system started from the USB stick (point 5) does not offer the option of calling up the advanced start options. Microsoft does not intend to switch off the automatic restart from here when a blue screen occurs. This is only possible if the rescue system was started from the hard disk.
You can still prevent the restart using a trick:
Step 1: Start the repair system from the USB stick. When the window with the title “Windows 11 Setup” appears (Windows 10: “Windows Setup”), hold down the Shift key and press the F10 key.
Step 2: Type regedit and confirm with the Enter key. The registry editor displays the registry of the repair system. To change this, go to the registry branch “Hkey_Local_Machine” and then to “File > Load structure” in the menu. Navigate to the “WindowsSystem32config” folder on the system drive, click on “SYSTEM” and then on “Open.”
The system drive may be located under a drive letter other than “C:”. Under “Key name,” enter the letter Z and confirm with “OK.” This mounts the registry of the installed system under “Hkey_Local_MachineZ.”
Step 3: Go to the key “Hkey_Local_MachineZControlSet001ControlCrashControl.” After double-clicking on “AutoReboot,” enter 0 under “Value” and click on “OK.”
Step 4: Go to “Hkey_Local_MachineZ” and then to “File > Remove structure” in the menu. Confirm with “Yes.”
Step 5: Exit the registry editor and the command prompt. Close the setup window and confirm the cancellation of the installation with “Yes.”
If Windows restarts now, the blue screen will remain visible until you switch off the computer.
Note for Bitlocker users: You can only gain access to the system drive if you unlock it in the command prompt. To do this, use the command
manage-bde -unlock C: -recoverypassword [recovery key]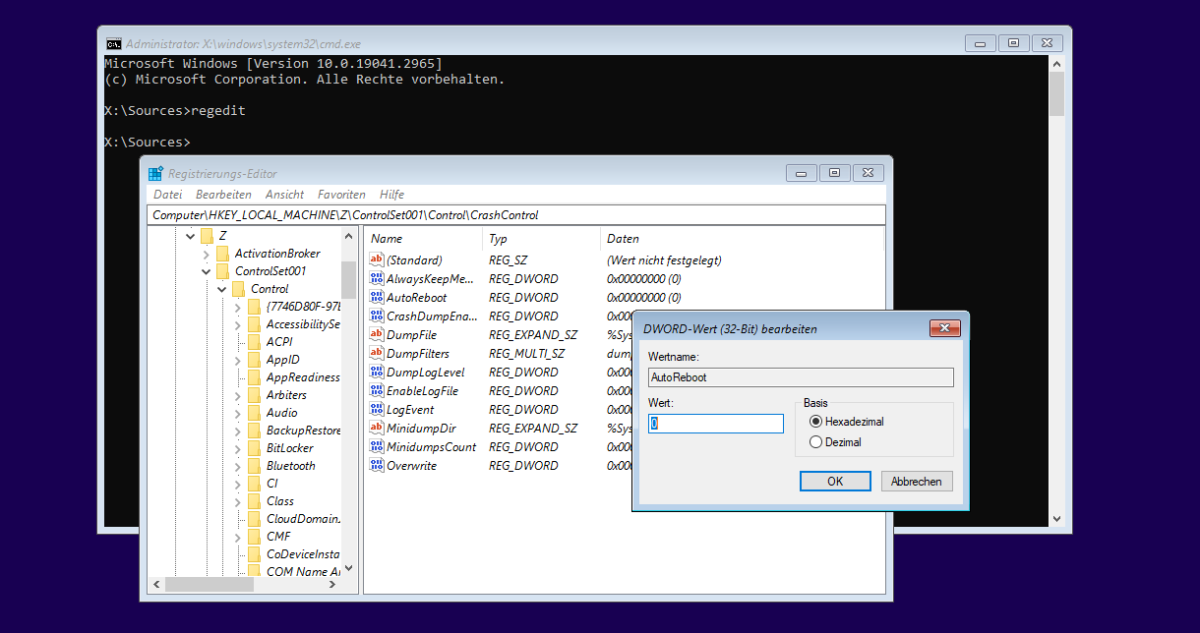
Prevent automatic reboot: In the rescue system, you can switch off the reboot by making an entry in the registry. “AutoReboot” is given the value “0”.
IDG
7. Start repair system directly
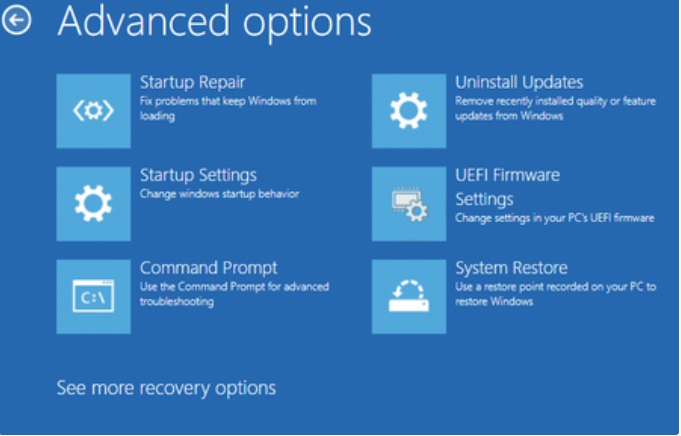
You can access the repair system from the running Windows as follows: Click on “On/Off” in the Start menu, hold down the Shift key, and click on “Restart.” Windows will restart and you will see the “Select option” screen.
After clicking on “Troubleshoot,” “Advanced options,” “Startup settings,” and “Restart,” you will be taken to “Advanced startup options” and you can select “Disable automatic restart on system errors” or “Safe mode.”
However, if Windows crashes immediately after starting, this option is blocked and you must use the rescue system as described in point 6. As an extension of point 4, you have another option to prepare for this situation in good time.
If you include the rescue system (WinRE) directly in the boot menu, you do not have to take the diversions via the “boot settings.” However, this requires that the hard drive is accessible and that there is no hardware defect. Otherwise, the rescue system cannot be started from the hard drive and you should try the method described in point 5.
Set the Bootice tool to create a start menu entry for WinRE:
Step 1: Go to “BCD” in Bootice, leave the option “BCD of current system,” and click on “Professional mode.” Under “Application objects” you will see that there is already an entry labelled “Windows Recovery Environment,” but it is not displayed in the boot menu. It is called up via the Shift-“Restart” combination.
Step 2: Right-click on “Windows Recovery Environment” and select “Duplicate this entry” from the context menu.
Step 3: For the new entry, double-click on “Description” and enter “WinRE” as the new name, for example. Close the window.
Step 4: Click on “Easy Mode” and check the settings for the new entry “WinRE.” The entry after “Partition” must refer to the recovery partition, for example “GPT3.” Behind “Boot file:” is “RecoveryWindowREWinre.wim” and behind “SDI file” something like “(hd0,3)” and “RecoveryWindowsREboot.sdi.” Below “Options” behind “Boot file:” is the entry “windowssystem32winload.efi.” If the configuration on your PC is different, correct the information.
Step 5 (optional): Remove the tick in front of “Metro Boot Manager (win8)” from all boot menu entries. This activates the classic boot manager on a black background, which displays its menu before the operating system starts.
The new Metro Boot Manager first activates the standard system in the background and displays the system selection in a graphical interface. This means that the standard system is ready for use quickly, but it takes a little longer to start WinRE.
If you restart Windows now, the installed system will be loaded automatically after a timeout of 30 seconds. Select the new boot menu entry “WinRE” to start the rescue system directly.
8. Faulty updates
Irrespective of the error message in the blue screen and without knowing the exact cause, simple measures usually help to eliminate the BSOD problem.
We assume that Windows was running correctly immediately after the computer was reinstalled or started up for the first time and that the error was only triggered later by a change to the system. Recent Windows or driver updates, the installation of new software, or even a software update are suspected.
If Windows is still starting: In the “Settings” (Win-I), go to “Apps > Installed apps” (Windows 10: “Apps > Apps and features”). Under “Sort by,” set “Date of installation.” The most recently installed programs will then appear at the top of the list.
After a plausibility check, uninstall the most recently installed program(s). Programs that start automatically and use system services or drivers are possible sources of error.
Proceed in the same way with Windows updates. Go to “Windows Update” in the “Settings” (Windows 10: “Update & Security > Windows Update”). Set a longer period behind “Suspend updates,” for example “Suspend for 4 weeks.” This will prevent a faulty update from being reinstalled immediately.
Windows 10 users click on “Advanced options” and set a date in the future under “Suspend until:”.
Click on “Update history” or, for Windows 10, on “Show update history.” Under headings such as “Quality updates” and “Driver updates,” you will see chronological lists of installed updates with the corresponding KB numbers.
Clicking on an entry takes you to a Microsoft page with further information on an update. An internet search for the respective KB number can provide information on whether errors or crashes are already known in connection with this update.
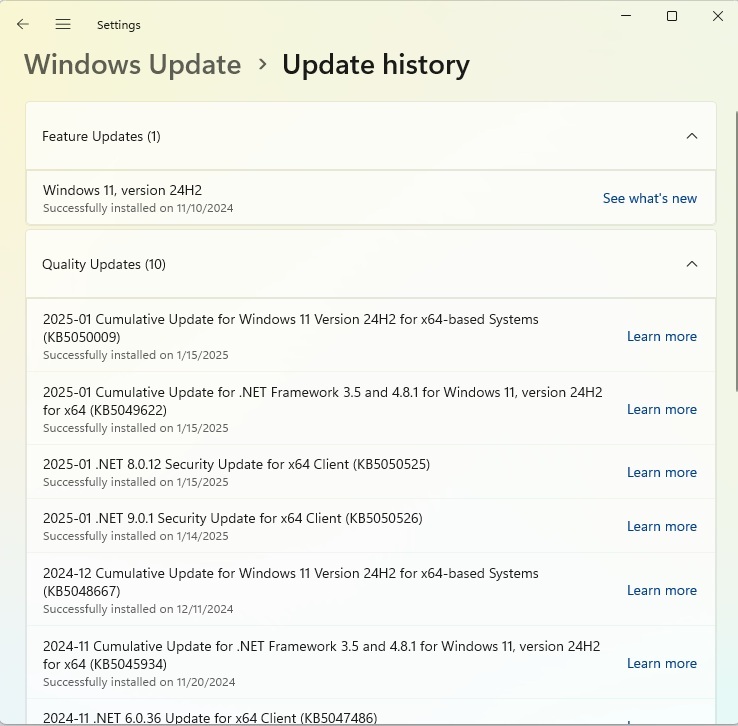
Which updates have just been installed? The “Update history” shows the Windows updates in chronological order. The KB number can be used to search for information on the internet.
Foundry
Click on “Uninstall updates” below “Related settings” (Windows 10: “Uninstall updates” link at the top of the window) and remove the update that is causing the blue screen.
In Windows 10, the link in the Control Panel leads to “Uninstall updates.” However, not all updates can be removed because they build on each other. Windows 11 therefore only shows the latest updates that you can uninstall. Windows 10 also shows older updates, but the “Uninstall” button only appears if you click on one of the newer entries.
If Microsoft has corrected the error in the Windows update, the update can be reinstalled. The set update delay should provide sufficient time for this.
Carry out repairs in safe mode: If Windows does not run stable enough in standard mode, try safe mode. To do this, call up the “Startup settings” as described under point 3 or 4 and select “Enable Safe Mode.” Windows will then only load the most necessary drivers, which makes a blue screen less likely.
Windows updates and programs can be uninstalled in safe mode in the same way as in standard mode. You can also call up System Restore (see point 9).
Uninstall updates via the rescue system: If Windows no longer starts and even safe mode does not help, boot the PC from the installation disc (see point 5) and start “Repair my PC” (Windows 10: “Computer repair options”). Click on “Troubleshoot” and then on “Uninstall updates” in the “Advanced options” window.
As a rule, select “Uninstall the latest quality update,” which will remove the latest Windows update. Click on “Uninstall the latest feature update” if you installed it shortly before the blue screen first appeared.
Under “Advanced options” you can also click on “Restore system” and select a previously saved restore point (see point 9).
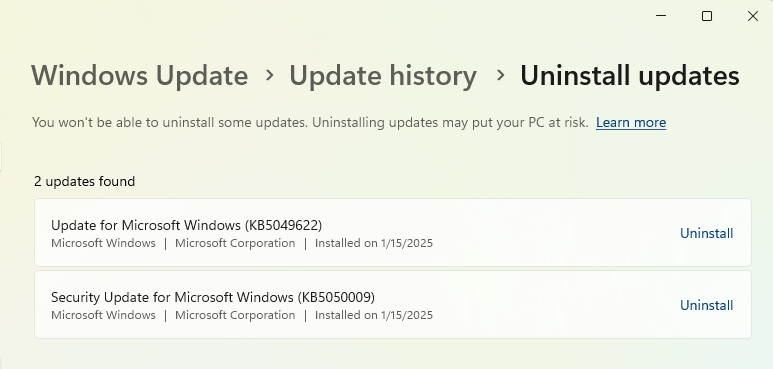
Remove updates: If a recent Windows update is suspected of causing a blue screen, it can be uninstalled.
Foundry
9. Use recovery
Windows and some setup programs create a restore point before making major changes to the system. The prerequisite for this is that System Restore is activated (see box “Using restore points for a backup”).
In Windows 11 from 24H2, press Win-R, type rstrui and click “OK.” In the “System Restore” window, the option “Recommended restore” is preset, which displays the date of the last restore point.
As a rule, select this if the date is shortly before the first occurrence of the blue screen. Otherwise, activate the option “Select another restore point.” After clicking on “Next,” select the desired restore point.
In the “Confirm restore point” window, click on “Search for affected programs.” System Restore will now show you programs, drivers, and Windows updates that were installed after the restore point was created.
Make a note of the contents of the list so that you can reinstall these programs later. However, this could also include the software that caused the problem. Personal documents are always retained during the restore.
Back in the main System Restore window, click on “Finish.” Confirm the process with “Yes.” Windows will begin the restore process and then restart.
The process is similar for older Windows 11 versions and Windows 10. After clicking “Next” for the first time, you will see a list of restore points from which you can select the desired entry. Tick “Show more restore points” to see older versions. Then continue as described for Windows 11.
10. Eliminate driver errors
The measures described under points 8 and 9 can be used to remove drivers or undo driver updates. If the error message in the blue screen refers to a specific driver, this can also be dealt with specifically. If you do not know which device a driver belongs to, search the internet for the name of the driver.
While Windows is running, open the Device Manager, for example by pressing the Win-X key combination or right-clicking on the Start menu, which will take you to the menu for administrative tools.
Go to the affected device, right-click on the entry, go to “Update driver” and then to “Search for drivers automatically.” If an update is available, install it. Alternatively, you can also go to the hardware manufacturer’s website and check for updates.
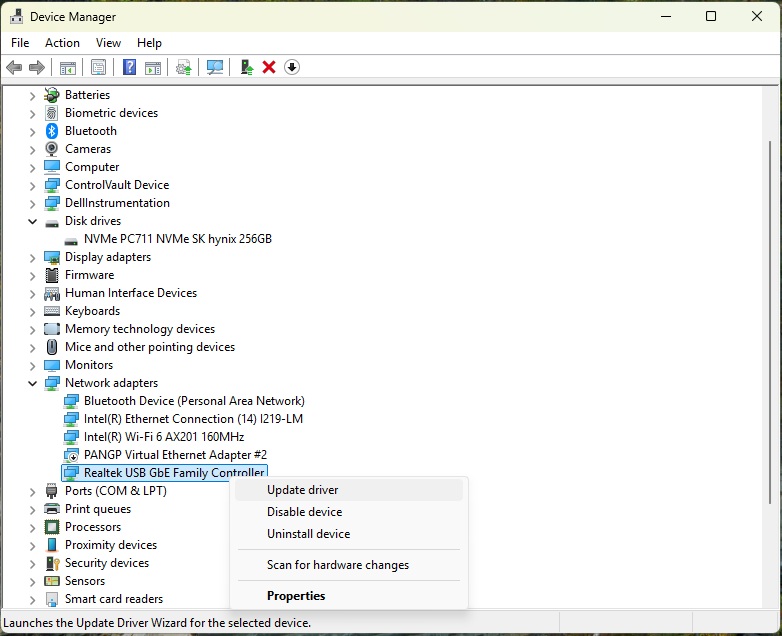
Undoing an update: If a newly installed driver does not work properly and causes a blue screen, restore the previous version of the driver via the Device Manager.
Foundry
Use older driver: If a driver has become unusable due to an update, revert to the previous version. In the Device Manager, go to “Properties” in the context menu of the affected hardware and click on the “Driver” tab.
Click on “Previous driver” — if available — and select a suitable option under “Why do you want to revert to the previous driver?” Click on “Yes” and the driver will be replaced.
Use the rescue system: If Windows no longer starts, boot the PC from the installation medium (see point 5). As soon as the window with the title “Windows 11 Setup” appears (Windows 10: “Windows Setup”), hold down the Shift key and press the F10 key.
A command prompt opens, in which you type notepad and confirm with the Enter key. Go to “File > Open” and select “All files” after “File type.” The “Open” dialogue can now be used as a file manager.
Go to “WindowsSystem32Drivers” in the system drive and search for the problematic driver. Use the “Properties” context menu item to display the manufacturer of the driver on the “Details” tab.
As a rule, you should not do anything with a Microsoft driver unless you know exactly what the consequences are. If it is a third-party driver, rename the file, for example from “Driver.sys” to “Driver.sys.bak.”
Windows will then be unable to load the driver and the system should boot without errors. However, the associated device will no longer work. For a permanent solution, install an updated driver or search for a solution in the manufacturer’s support forums.
Use restore points for a backup
To be prepared for an emergency, you should check whether System Restore is active. You can find the options in the Control Panel.
For a quick call, press Win-R, type SystemPropertiesProtection and confirm with “OK.” Go to the “System Protection” tab. If the value “On” is shown in the “Protection” column under “Protection settings” for the system drive, the backup function is active.
Otherwise, click on the system drive and then on “Configure.” Activate the “Turn on system protection” option. Use the slider under “Disk Space Usage” to specify how much space the operating system should reserve for backups.
Select a two-digit gigabyte value and confirm the change with “OK.” Back in the previous window, click “Create” to create a first backup.
Windows sometimes creates restore points automatically, for example before updates or when installing new software. However, you cannot rely on this. You should therefore create restore points manually before making major changes.

Turn on System Protection in Windows before making changes to your system, so you can revert to the previous state if something goes awry.
Foundry
11. Unspecific errors
Sometimes the blue screen displays error messages that do not specifically refer to a driver. An example of this is “IRQL_NOT_LESS_OR_EQUAL,” which indicates an incompatible or outdated driver.
However, you often do not find out which driver it is. “UNEXPECTED_KERNEL_MODE_TRAP” can occur when PC components overheat. You should therefore check the fan performance and clean the fans if necessary. The blue screen may display “DATA_BUS_ ERROR” or “PAGE_FAULT_IN_NON_PAGED_ AREA” if the RAM is defective.
Eliminate a serious boot problem: The message “INACCESSIBLE_BOOT_DEVICE” (stop error 7B) occurs when Windows cannot access the system partition. Faulty updates or drivers as well as defects in the file system or a damaged drive may be the cause.
In the rescue system (see points 5 and 10), use Notepad to test whether access to the hard drive is still possible. If not, check in the BIOS/firmware setup whether the hard drive or SSD has been recognized. If this is not the case, check the data cable and power supply to the drive.
If the drive cannot be put into operation, it is probably defective and you will need to replace it.
To confirm the diagnosis, you should use an independent operating system to check whether the drive can be accessed. A Linux live system such as Ubuntu, which you can run with Rufus onto a USB stick and then boot. You can also access Windows drives via the Linux file manager.
If access to the hard drive is possible, try the “start help” via Windows in the rescue system (see point 5). If this does not help, check and repair important system files. In the rescue system, run the following at the command prompt
sfc /scannow /offbootdir=C: /offwindir=C:WindowsThe drive letter may differ in the rescue system. Determine it via the “Open” dialogue of Notepad. If this does not work either, start the following two command lines in the rescue system one after the other
Dism /Image=C: /Cleanup-Image /ScanHealthDism /Image=C: /Cleanup-Image /CheckHealthIf one of the commands reports an error, use the following command line
Dism /Image=C: /Cleanup-Image /RestoreHealthAdjust the drive letters for your system.
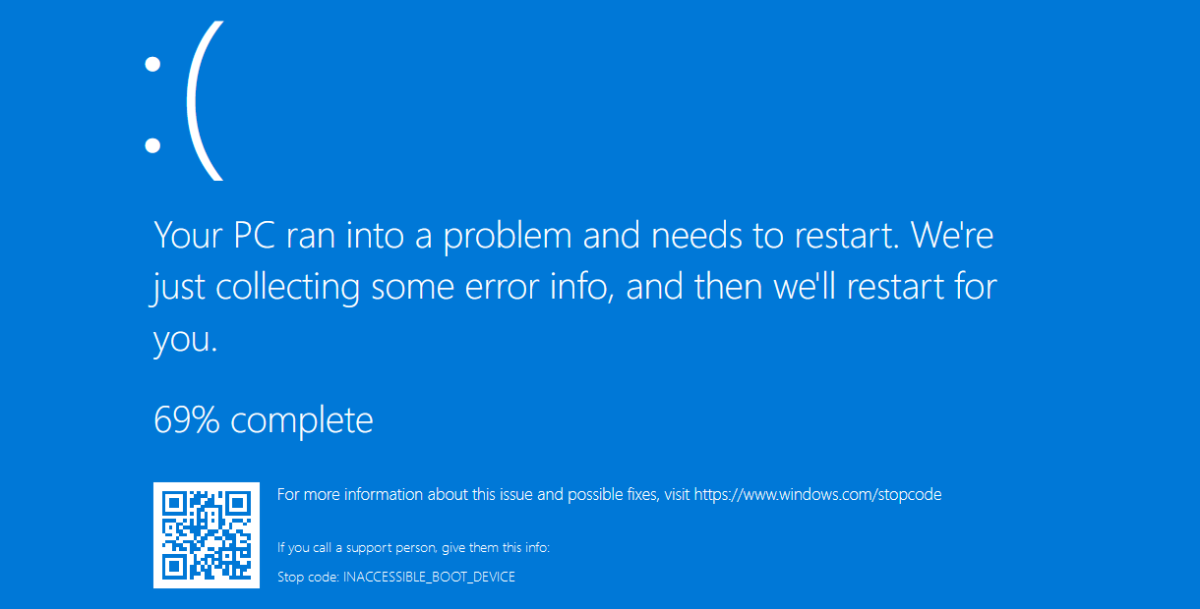
“Blue screen of death”: If Windows shows the error “INACCESSIBLE_BOOT_DEVICE”, the boot manager is incorrectly configured or the system drive is defective.
IDG
12. Repair Windows startup files
The “Startup help” attempts to repair the boot environment, but this is not always successful. A manual repair is more likely to be successful. To do this, start the command prompt in the rescue system. Type in diskpart and confirm with the Enter key.
Use list disk to display the drives and select the system drive with sel disk 0, for example. Use list vol to display the volumes. The EFI partition is formatted with the “FAT32” file system and is approximately 100MB in size.
If the EFI partition is called “Volume 2,” for example, mount it as drive “B:” with the following two commands:
sel vol 2assign letter=b:Press Esc to leave Diskpart. Execute the following four command lines on the command line
cd /d b:EFIMicrosoftBootbootrec /fixbootren BCD BCD.bakbcdboot C:Windows /l de-de /s b: /f UEFIReplace the drive letter “C:” with the letter previously determined for Sfc. Restart the computer. The UEFI boot environment should then work again.
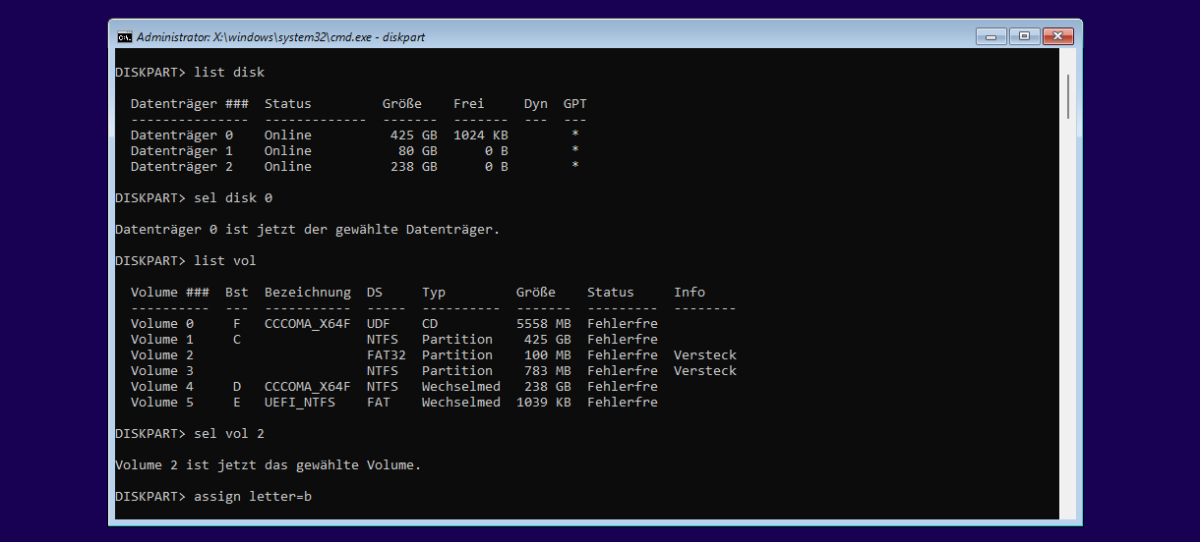
Boot repair: To repair the UEFI boot environment, you must first assign a drive letter to the EFI partition (FAT32) in the command prompt using Diskpart.
IDG
Restore Windows to factory settings
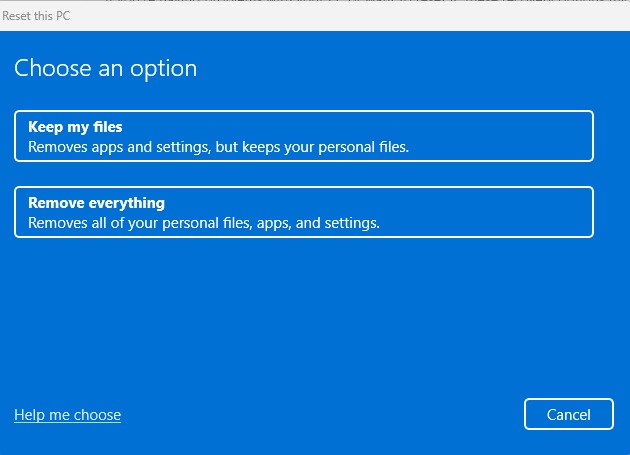
Microsoft offers several seemingly simple solutions for serious Windows problems. In “Settings” (Win-I), go to “System” and click on “Recovery” (Windows 10: “Update & Security > Restore”).
After clicking on “Reset PC” (Windows 10: “Let’s go”), select “Keep my files.” Installed programs, drivers and Windows settings will be deleted, but personal files will be retained. Windows will show you which programmes are affected after clicking on “Show apps that will be removed”.
The second option – “Remove everything” – corresponds to a new Windows installation. The personal files are lost and must be restored later from a previously created backup.
Windows 11 also offers the option “Reinstall now” under “System -‘ Recovery”, below “Fix problems with Windows Update”. Unlike “Reset PC”, Windows does not use the files saved on the hard drive, but downloads the current Windows version.
The advantage: You no longer have to install many updates and the system is up to date. However, the download takes some time if you have a slow internet connection.
If Windows no longer starts and the “Settings” can therefore not be called up, reinstalling via a Windows installation medium (see point 5) is the final solution. You must back up your own files beforehand.
Before resorting to these radical and time-consuming methods, you should consider the other measures described in this article.
Restore factory settings: The reset function replaces system files with the original version. This can rectify many errors, but you will have to reinstall all programs.
Foundry
13. Error analysis tools
The cause of a blue screen, be it a faulty driver or a problem with a Windows update, cannot usually be rectified directly. Instead, the problem can often only be circumvented. However, there are various tools that can analyze the crash and the generated memory image in more detail.
Although these tools are primarily intended for developers who want to check their own drivers, they can also be helpful for normal Windows users. The information provided can be used to search the internet for possible causes and solutions to the error.
The tool Who Crashed. After clicking on “Analyze,” it searches for .dmp files (point 2) and displays descriptions.
The Microsoft tool Windbg (via Microsoft Store app) can open .dmp files via “File > Open Dump File.” In the “Command” area, click on “!analyze -v”. Windbg then displays extensive information, including the name of the driver concerned.
Bluescreen View automatically opens all .dmp files from the folder “C:WindowsMiniDump.” The name of the driver that caused the crash appears first in the “File name” column. You can perform a Google search for error messages and drivers via the “File” menu.
This articles is written by : Nermeen Nabil Khear Abdelmalak
All rights reserved to : USAGOLDMIES . www.usagoldmines.com
You can Enjoy surfing our website categories and read more content in many fields you may like .
Why USAGoldMines ?
USAGoldMines is a comprehensive website offering the latest in financial, crypto, and technical news. With specialized sections for each category, it provides readers with up-to-date market insights, investment trends, and technological advancements, making it a valuable resource for investors and enthusiasts in the fast-paced financial world.