
No one who assembles a PC or sets up a new computer can avoid the BIOS or UEFI. That’s where you define the basics, from the boot sequence and memory profiles to security features like Secure Boot.
Modern UEFI interfaces are graphical, can be operated using a mouse, and are much more convenient than legacy BIOS text menus… but they can still be daunting for first-time users.
If you’re reluctant to dive into your PC’s BIOS/UEFI, have no fear! These tips will get you familiar and comfortable in no time.
How to boot into BIOS/UEFI settings
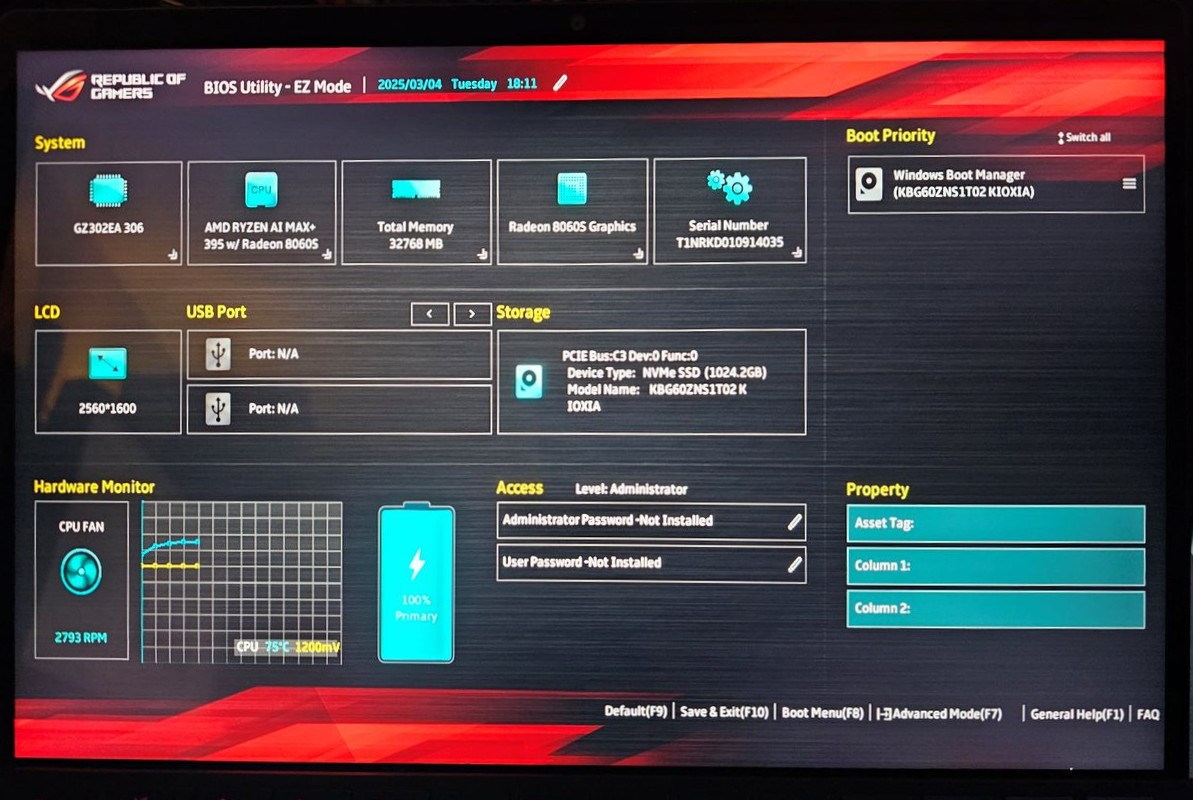
Mark Hachman / Foundry
In order to boot into BIOS/UEFI, you have to press a key (or a combination of keys) during the startup process. If you aren’t quick enough, or if you press the wrong keys, you’ll end up in Windows.
The exact key(s) you need to press depend on your motherboard’s manufacturer, but most of them use one of the following standardized keys: Delete, F2, F10, or F12. The correct key is often displayed on the screen for a brief moment with the motherboard logo, and it’s best to press the key several times as soon as you see it.
However, there’s also an alternative way in Windows 11: open Settings > System > Recovery, scroll down to the Recovery options and look for “Advanced startup,” then click the button labeled Restart now. There you can directly call up the UEFI firmware settings.
Step 1: Update your BIOS/UEFI
Before you even start fine-tuning, you should update your BIOS/UEFI to the latest version. New versions often bring better RAM compatibility, extend CPU support, and/or fix security vulnerabilities.
Download the update from the manufacturer’s website. (Pay attention to the exact model of your motherboard.) It will usually come as a ZIP file, which you can unzip and copy to a USB flash drive. Then, you should be able to find the update function in the BIOS under “EZ Flash,” “M-Flash,” or similar. (If you can’t find it, run a web search for instructions on how to update your particular motherboard.)
Important: Make sure your PC doesn’t crash, restart, or shut down during a BIOS/UEFI update. Also, refrain from experimenting with overclocking or unstable power supplies while updating. Also, avoid the update if there’s an impending thunderstorm or if there are known power fluctuations affecting your area/house.
Step 2: Set language and interface
Many modern UEFI menus offer a graphical view, and some of them even let you interact using mouse controls. You’ll usually find the language setting directly in the main menu or under a tab labeled “General Settings.” Always change the language first so that you can find your way around more easily later. Some motherboards also offer a “Simple view” for beginners and an “Advanced mode” for fine-tuning.
Step 3: Customize the boot sequence
In order to install Windows on a PC, the PC must be bootable from a USB flash drive. That means you might have to re-order the boot sequence so that if the system detects a plugged-in USB drive, it first tries to boot off of it before moving on to the internal SSD (for example).
You can do this in the BIOS/UEFI by navigating to the appropriate section and dragging the USB flash drive option to the top. After Windows is installed, make sure to change the order back and select the Windows Boot Manager or your system hard drive as the first boot device.
Tip: If your PC doesn’t reliably recognize your USB drive at startup, try deactivating “Fastboot Mode.”
Step 4: Optimize working memory
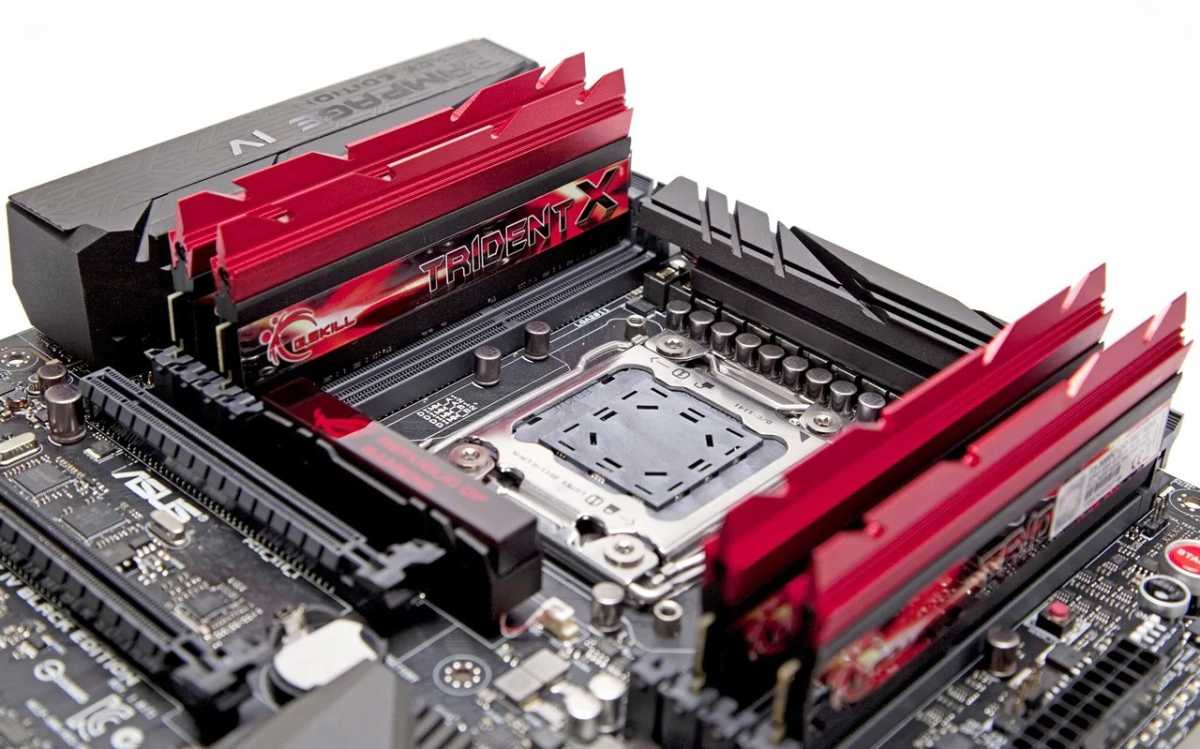
Foundry
By default, RAM often only runs at base clock rate. Activate the appropriate profile in the UEFI—depending on the manufacturer, this is called XMP (Intel), DOCP (Asus/AMD), or EXPO (AMD). This allows your RAM to utilize the full speed for which it’s designed without you having to manually overclock. You can usually find this option on the main page of the UEFI menu or under a tab such as “AI Tweaker” (for Asus), “OC” (for Gigabyte), or “Advanced Memory Settings.”
Step 5: Set the fan and temperatures
You can adjust fan curves under menu items such as “Q-Fan” or “Smart Fan Control,” which allows you to determine how loudly or quietly your PC fans run in everyday use. A steeper curve (i.e., faster at higher temperatures) is recommended for gaming while a flat curve (i.e., remain slow even when temperatures rise slightly) is more suitable for office or home server use, ensuring peace and quiet.
Step 6: Optimize energy and performance
Many motherboards offer power-saving features such as “C-States” (reduces the CPU voltage when idle) or “ErP ready” (reduces power consumption when switched off). If you need more power, activate Turbo Boost (Intel) or Precision Boost Overdrive (AMD). The latter ensures higher clock rates, but requires good cooling.
Note: The combination of power-saving features and aggressive performance options can lead to instability on cheaper motherboards. If your PC crashes frequently after making such changes, switch Turbo Boost/PBO/C-States off again as a test.
Step 7: Check security settings
In order for Windows 11 to be installed, certain security features must be active in the BIOS/UEFI. If they’re missing, the setup will be canceled or even refuse to start. The two most important options are:
- Enable Secure Boot: Ensures that only boot loaders signed by Microsoft are loaded. Without Secure Boot, malware could be installed before the operating system starts. As a security measure, Windows 11 will refuse to install without Secure Boot.
- Enable TPM 2.0: Referred to as “fTPM” (AMD) or “PTT” (Intel) depending on the manufacturer. TPM 2.0 stores cryptographic keys securely in the system. Windows 11 will refuse to install without it.
It’s also worth taking a look at the extended security options:
- BitLocker support: With TPM enabled, hard drive encryption such as BitLocker can be used without additional effort. This protects your data in the events of theft or loss of the computer.
- Supervisor/BIOS password: Protects the firmware settings from unauthorized access.
- Lock interfaces: Some motherboards allow you to deactivate USB ports or network adapters directly in the UEFI. This is practical for particularly sensitive environments where access to external devices needs to be restricted for security reasons.
Step 8: Other advanced features
If your PC is still running stably after all of the above tweaks, it’s now worth taking a look at some additional options:
SATA/NVMe mode:
- For single SSDs and HDDs, AHCI is the standard. This ensures full performance and TRIM support.
- RAID is only worthwhile if you want to use several drives for purposes of data mirroring (RAID 1) or performance (RAID 0). Importantly, this setting must be defined before Windows is installed, as changing it later can lead to startup errors. Learn more about RAID setups and multiple drives working together.
Activate virtualization:
- Features such as Intel VT-x and AMD-V make it possible to run virtual machines efficiently. If you want to use Hyper-V, VirtualBox, or VMware, you should switch this option on.
- Without virtualization activated, many things will still run but with significantly reduced performance.
IOMMU/SR-IOV (optional):
- This feature is interesting for advanced users who want to use device passthrough or special virtualization scenarios.
- Tip: Even if you don’t need virtualization immediately, you can activate the feature directly now. This will save you having to search the BIOS later if you ever end up experimenting with virtual machines.
Get comfortable with your BIOS/UEFI
In short, the BIOS/UEFI is the control center of your PC. Just a few settings—such as RAM profile, boot sequence, and Secure Boot—can make a world of difference between a system that’s limping along versus a system that’s stable, fast, and secure.
If you feel like it, you can eventually try your hand at fine-tuning the deeper settings, from individual fan curves to overclocking. But even without experimenting, with the right BIOS/UEFI settings, your new PC will now be ready to start and optimally prepared.
Good to know: You only need to make most BIOS/UEFI adjustments once. After that, your computer will run permanently with the optimum settings without needing any annoying readjustments.
This articles is written by : Nermeen Nabil Khear Abdelmalak
All rights reserved to : USAGOLDMIES . www.usagoldmines.com
You can Enjoy surfing our website categories and read more content in many fields you may like .
Why USAGoldMines ?
USAGoldMines is a comprehensive website offering the latest in financial, crypto, and technical news. With specialized sections for each category, it provides readers with up-to-date market insights, investment trends, and technological advancements, making it a valuable resource for investors and enthusiasts in the fast-paced financial world.