Like any surface, a wood floor can get stained and dirty, but you have to be really careful with how you clean it. You shouldn’t use harsh chemicals, whether your floor is sealed or unsealed, because you don’t want to damage the wood itself, but that leaves you with fewer options. I tried two—well, three, but we’ll get to that—simple techniques that didn’t require any intense chemicals today and they both worked well.
Remove stains from wood floors with vinegar
First, I assessed the stains I was dealing with, which I noticed while cleaning under my couch earlier in the week. They appeared to be leftover from a project I did a while back involving glue, newspaper, and paint, so I had a big selection of stain types to test my methods on. In general, whether you’re working on sealed or unsealed floors, you want to dab, not drench, your stain, so liquid doesn’t seep into any cracks and cause damage underneath, which I kept in mind while I got to work with my first test: vinegar. If you’re not sure whether your floor is sealed or unsealed, place a few drops of water on the surface. If they stay beaded up on top, it’s likely sealed, but if they absorb quickly, it likely isn’t. I am a renter in my home and wasn’t here when this floor was put down, which means I don’t know anything about it for sure, so checking that was important. If your floor is unsealed, try these steps with soap and water before moving on to vinegar if you have to, but since mine is sealed, I went straight to the cupboard staple.
I mixed equal parts vinegar and warm water, then dabbed it up and down on the stains, pausing every few seconds to give the stain I was working on a good scrub with my rag. The dilution here is important, as pure vinegar can be too acidic and can break down sealant if it’s too strong. It definitely took some time (and smelled bad, of course) but slowly, darker stains started to lift up. Once I’d removed them most of the way, I went in with a melamine sponge and they basically disappeared—and with them went the fear I’d need to make an emergency Target run to get something stronger.
Remove harder stains with baking soda paste
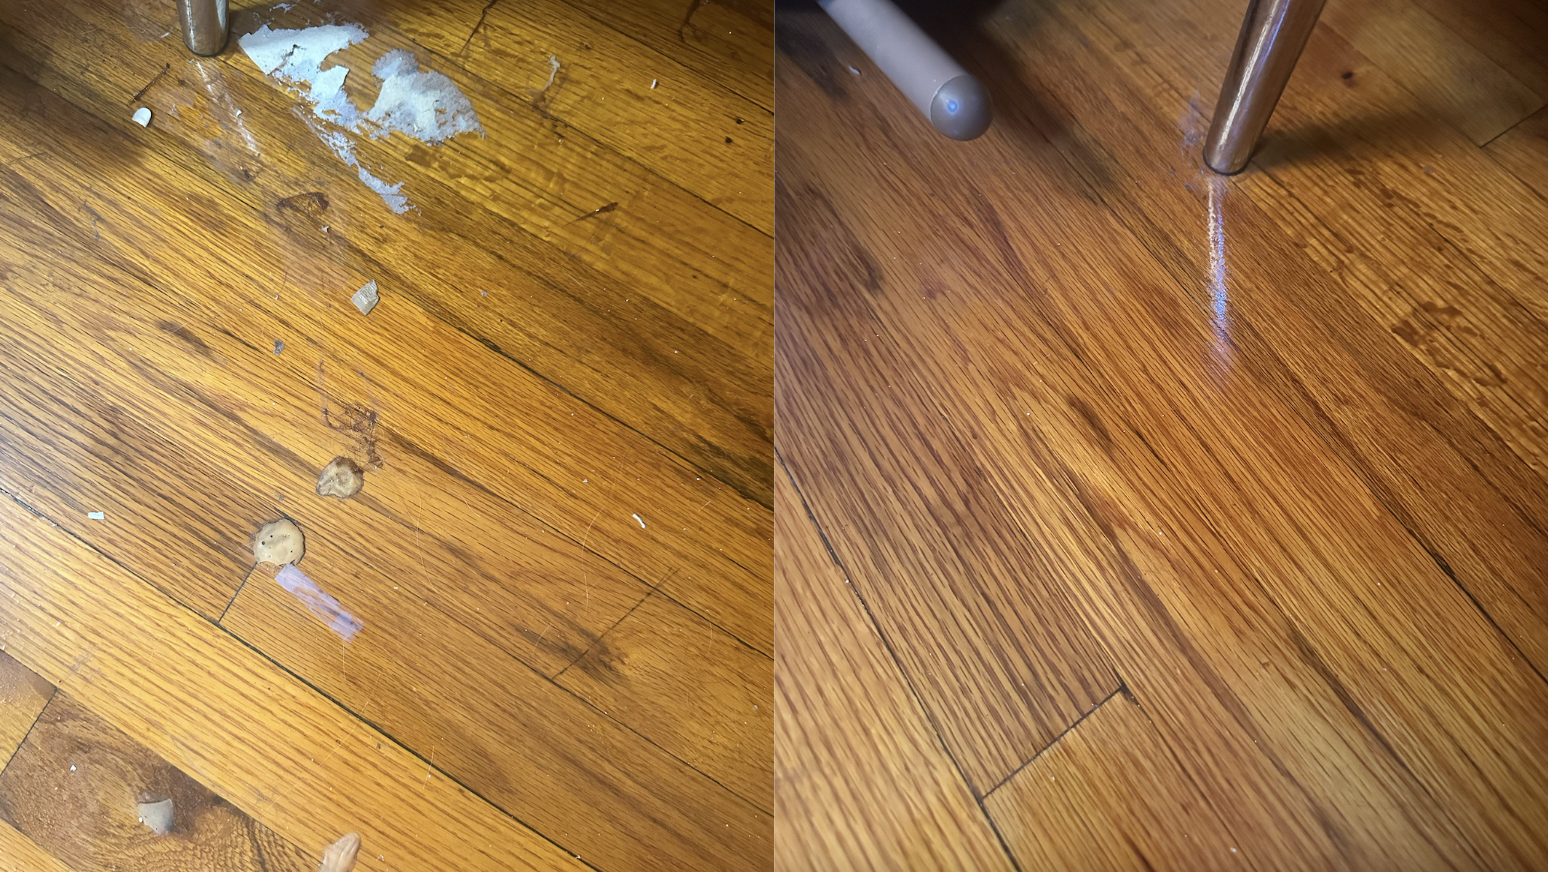
The problem on the left. Baking soda paste and vinegar on the right. Credit: Lindsey Ellefson
A few stains seemed more deeply set-in, but I knew I didn’t want to leave them drenched in vinegar and risk the integrity of the floor. For those, I made a paste by filling a small bowl halfway with water, then adding and stirring in baking soda until it was thick. I’m a fan of the abrasive quality of baking soda when used to clean, but also its lack of acidity. I left the paste on the stains for about 20 minutes, wiped it off, and proceeded with my melamine sponge. These, too, came right up.
You shouldn’t use this technique to clean the whole floor. It’s just not necessary. The best uses for baking soda paste on wood floors are these:
When a stain is really set in there and regular cleaning doesn’t budge it
When the stain is oily or greasy
Bonus: Glue and squished sticky stuff get the hair dryer
Those two methods worked really well and thankfully didn’t require harsh chemicals or cause any damage to my floors, but at the end of my experiment, I was still left with some splotches. They were raised, not technically “stains,” but they deserve inclusion here nonetheless. I’d been afraid that those were made up of glue, but now I was sure. I tried prying them up with a knife and got nowhere; they were stuck. I read up on what to do and found that most pros suggested I trek to the hardware store for professional adhesive remover. For under $15, you can definitely do that, but before I spent hard-earned money on a solution I needed to use just once, I had the idea to try something else for free.
Two weeks ago, I wrote about how easily you can remove stickers from household goods by blasting them with a hair dryer. It couldn’t hurt to give that a shot on the floor, right? I directed the heat at all four glue spots, one at a time, for about 45 seconds. Each one peeled up like magic, despite being very firmly attached just a minute prior. Beyond not having to spend $15 on a product that would then clutter up my cleaning shelf for years to come, I didn’t have to apply anything harsh to the floor. For messes that are gelled, stuck, or otherwise squished onto your wood floor, try the hair dryer first.
Overall wood floor stain-removing tips
Whichever method you try, do a spot test first in an inconspicuous place, like under a big piece of furniture. As mentioned, dab, don’t drench, and avoid using anything really acidic or harsh, like acetone (which I was close to doing for the glue before reconsidering what a nightmare that could be for my sealant). If baking soda paste isn’t quite abrasive enough, don’t reach for anything too stiff to scrape at stains. Instead, opt for a semi-sturdy sponge or an old toothbrush. The goal here should be spot-treating only, too. Don’t distribute your vinegar or baking soda paste any farther than you have to. Just keep it on the stain and dab up and down.
When I finished up and had all my stains removed, I definitely had some crusty baking soda left over, as well as some suds from using the Mr. Clean Magic Eraser Ultra Foamy, so the job didn’t end there. I wiped the whole area down with some Fabuloso, the same as I would for normal cleaning, and then let it air dry. Unless you have great luck with the vinegar from the get-go, this isn’t a quick process from spot testing to finishing, so make sure you allot enough time.
This articles is written by : Nermeen Nabil Khear Abdelmalak
All rights reserved to : USAGOLDMIES . www.usagoldmines.com
You can Enjoy surfing our website categories and read more content in many fields you may like .
Why USAGoldMines ?
USAGoldMines is a comprehensive website offering the latest in financial, crypto, and technical news. With specialized sections for each category, it provides readers with up-to-date market insights, investment trends, and technological advancements, making it a valuable resource for investors and enthusiasts in the fast-paced financial world.