
Windows’ built-in network protection is like a front door that is locked from the outside, but through which any resident can carry valuables outside without being checked. By default, Microsoft allows almost any program to send data out without being checked — this is known as a lack of egress filtering.
If you want to know which apps are sending data back to their developers, or wish to prevent malware from contacting its command server — the so-called command-and-control instance — in the event of an attack, you need to tighten the reins.
With the right filters and targeted protocol hardening, you can transform the open Windows data highway into a strictly controlled border crossing that checks every outgoing packet thoroughly.
The basic check in Windows Security
Before we raise the digital drawbridge, head to the Firewall & network protection menu item in Windows Security. Here, you should ensure that your network profile is correctly assigned: use Private only on your home network. At hotspots, Public is mandatory to block connection attempts from external devices.
However, you should not simply accept the default configurations as they are. Their greatest risk lies in their one-sidedness: While incoming data packets are checked, outgoing connections are usually given the benefit of the doubt. This is precisely the problem — because spyware or ransomware can thus make contact with criminal masterminds unhindered.
Although Windows offers detailed filter rules under Advanced settings, this console is a confusing jungle of rules for non-technical users. To safely and conveniently harness the underlying technology of the Windows Filtering Platform (WFP), we rely on the sophisticated Simplewall tool. As a pure front-end enhancer, it makes Windows’ powerful WFP functions accessible via a simple interface.
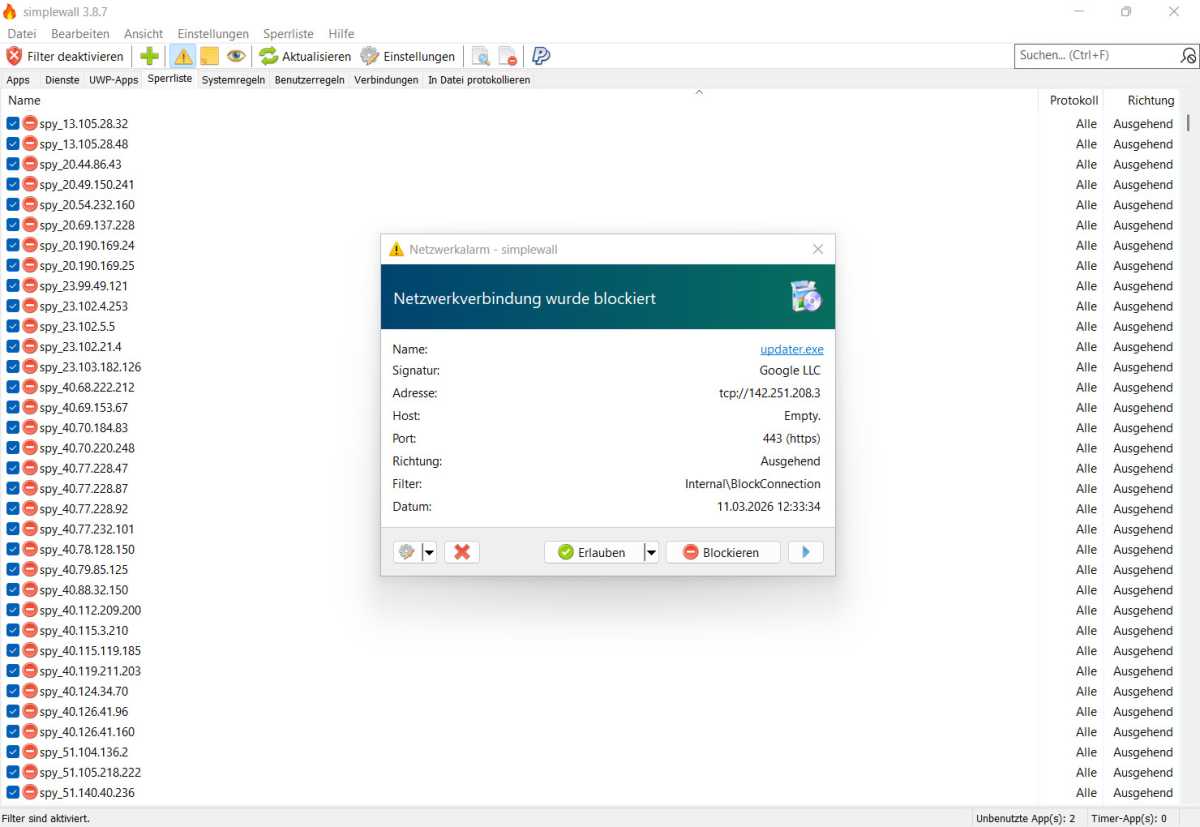
Full transparency: Simplewall intercepts every connection attempt unconditionally. Only upon your explicit approval does an app gain access to the network. Windows telemetry is blocked by default.
Steffen Zellfelder
Digital radio silence with Simplewall
After launching the tool, activate the service via Enable Filter and Permanent Rules. The tool now operates on a whitelist principle: Every app is blocked until you approve it in learning mode with a single click. You’ll be surprised how often harmless tools like the calculator or graphics drivers request a connection without asking.
By blocking these specifically, you not only reduce the telemetry load but also stop potential malware communication. In the settings (the Blocklist tab), you can also activate pre-configured rules against Microsoft telemetry with a single click.
For stable operation, you should also allow essential services such as the DNS Client in the System Rules tab. Don’t worry about experimenting: As soon as you disable the filtering, the standard Windows Firewall rules will immediately take effect again.
DNS hardening: Plugging the metadata leak in your network
Every time you visit a website, it starts with a DNS query, which by default is sent unencrypted. This means your internet service provider or potential attackers on the same network can see exactly which servers you’re accessing, as if reading an open book.
Windows 11 offers a modern solution for this in the form of DNS over HTTPS (DoH), which hides these requests within an encrypted tunnel. To configure DoH, navigate to Network & internet in Settings and select your active adapter.
In other words, Ethernet or Wi-Fi. Then, under Hardware properties, click Edit next to DNS server assignment. Here, set the option to Manual and tick the boxes for IPv4 and IPv6. The latter prevents Windows from bypassing encryption via the IPv6 protocol.
For the Preferred DNS under IPv4, enter, for example, 9.9.9.9 (Quad9, filters malicious sites) or 1.1.1.1 (Cloudflare, focuses on speed). For the IPv6 configuration, use the addresses 2620:fe::fe (Quad9) or 2606:4700:4700::1111 (Cloudflare). Important: You must set the DNS-over-HTTPS template described in the next step identically for both protocols (IPv4 and IPv6).
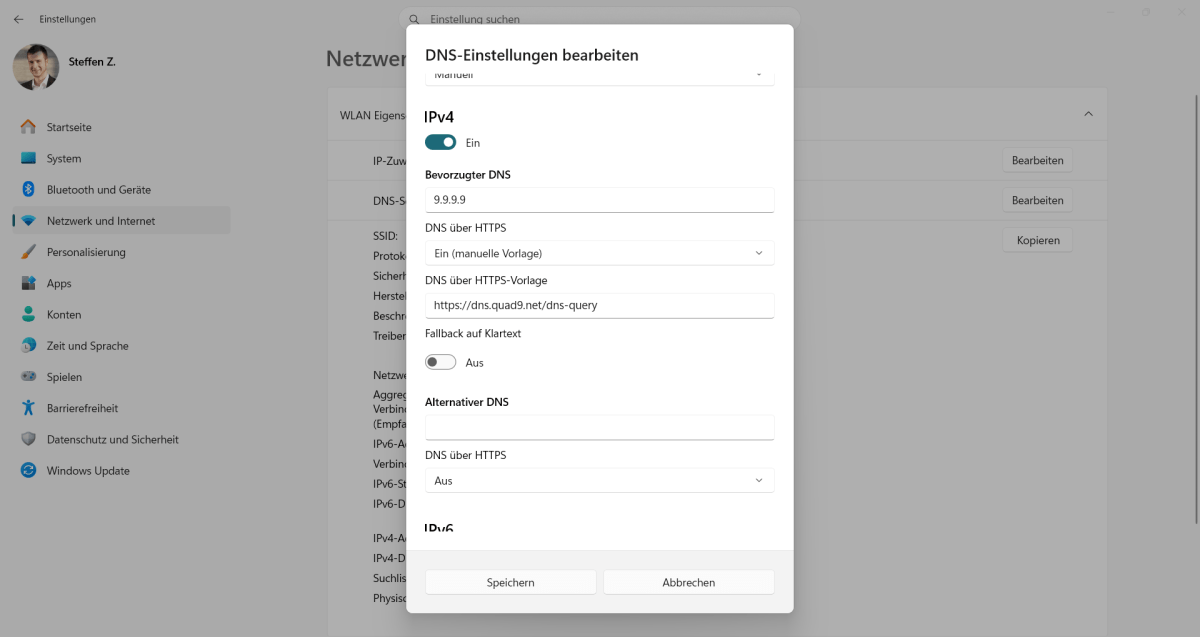
Consistent data protection: In the Windows network settings, ensure that the manual template is selected under “DNS over HTTPS” and that the fallback to plain text is disabled. This ensures your DNS queries remain protected from prying eyes.
Steffen Zellfelder
The crucial step now follows in the drop-down menu under DNS over HTTPS, where you select the option On (manual template). In the DNS over HTTPS Template field that appears, copy the address https://dns.quad9.net/dns-query for Quad9 or the URL https://cloudflare-dns.com/dns-query for Cloudflare. Also, make sure to set Fallback to plain text to Off: If Windows does not receive an encrypted response from the server, communication will be refused.
Defender Network Protection
The additional protection feature Defender Network Protection blocks connections to known phishing sites and malware servers at the network level — even if an application attempts to establish the connection directly. For this protection to take effect, Microsoft Defender must be running as active real-time protection.
In Windows 11 Pro, the feature can be easily enabled via the Group Policy Editor. Press Windows-R to run the command gpedit.msc, then navigate to Computer Configuration > Administrative Templates > Windows Components > Microsoft Defender Antivirus > Microsoft Defender Exploit Guard > Network Protection.
Here, locate the entry Prevent users and apps from accessing dangerous websites and after double-clicking it, set it to Enabled. In the options field below, then select the Block entry.
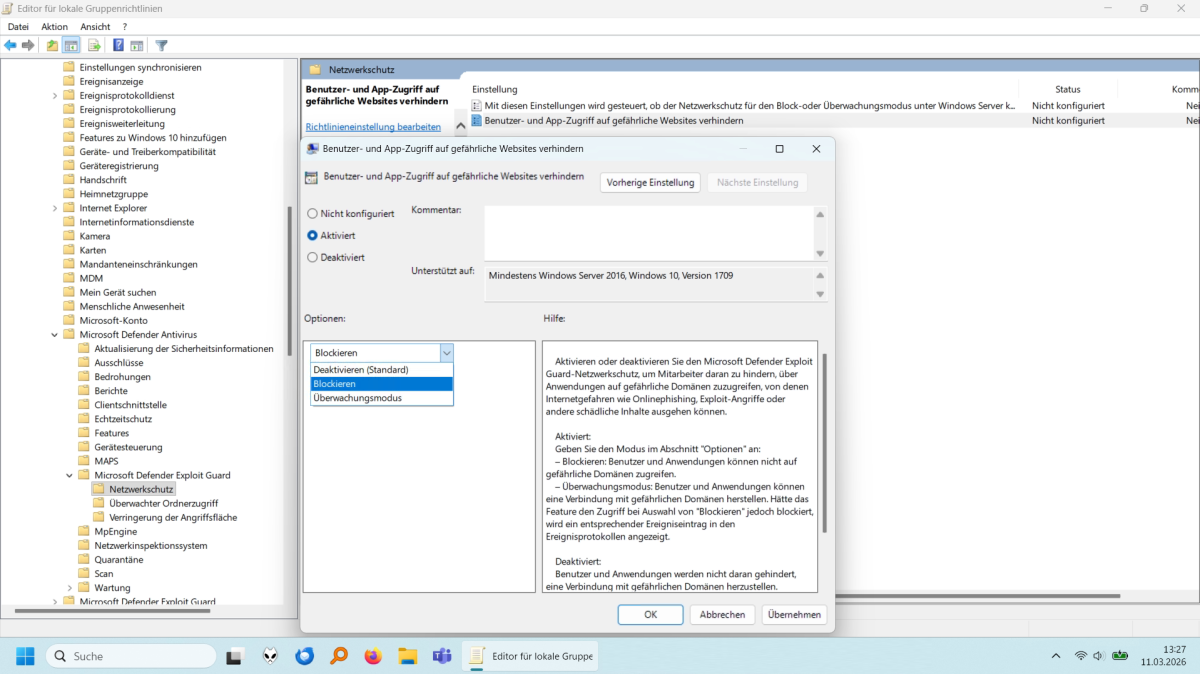
Enabling in the Editor: Once you have set the status to Enabled at the top, you can select Block mode in the lower section. This combination activates proactive protection against dangerous domains.
Steffen Zellfelder
Tip for Windows Home users: As the Editor is not available here, open a PowerShell window with administrator rights (right-click on Start) and use the command Set-MpPreference-EnableNetworkProtection Enabled. Once protection is active, Windows blocks malicious connections even if a program has internet access.
Overview: Technical terms relating to network hardening
| Term | What it means | Security relevance |
| Egress filtering | Monitoring and filtering of outbound network traffic at the firewall. | Prevents data leakage caused by malware and blocks communication with botnet servers. |
| DoH (DNS over HTTPS) | Encrypts domain name queries (e.g. google.de) via port 443. | Protects DNS queries from being intercepted by third parties; makes it more difficult to create browsing profiles. |
| LLMNR / NetBios | Obsolete protocols for name resolution on the local network (replacement for DNS). | Disabling this prevents passwords from being intercepted through manipulation of the name lookup (spoofing/poisoning). |
| Man-in-the-Middle (MitM) | An attacker positions themselves unnoticed between two communicating parties in order to control the data flow. | The aim is to intercept passwords or manipulate data. |
| SMB (Server Message Block) | Protocol for file and printer sharing on a local network. | A frequent target for worms and ransomware (prominent example: WannaCry). |
| Stealth mode | The firewall silently discards packets without responding (“Drop” instead of “Reject”). | Reduces the visibility of the PC to port scanners/ping requests and reduces automated attack attempts. |
Stealth mode: Ensuring invisibility on networks
Modern Windows systems are configured by default to operate in so-called Stealth Mode. This means that the Windows Firewall does not respond to unauthorized connection requests with an explicit rejection (Reject), but instead drops the data packets without any feedback (Drop). This makes it more difficult for attackers to identify your system.
An entry in the Policies path also ensures that third-party tools cannot quietly weaken or disable Stealth Mode. To do this, press Windows+R, type regedit, and press Enter. Navigate to the path HKEY_LOCAL_MACHINESOFTWAREPoliciesMicrosoft.
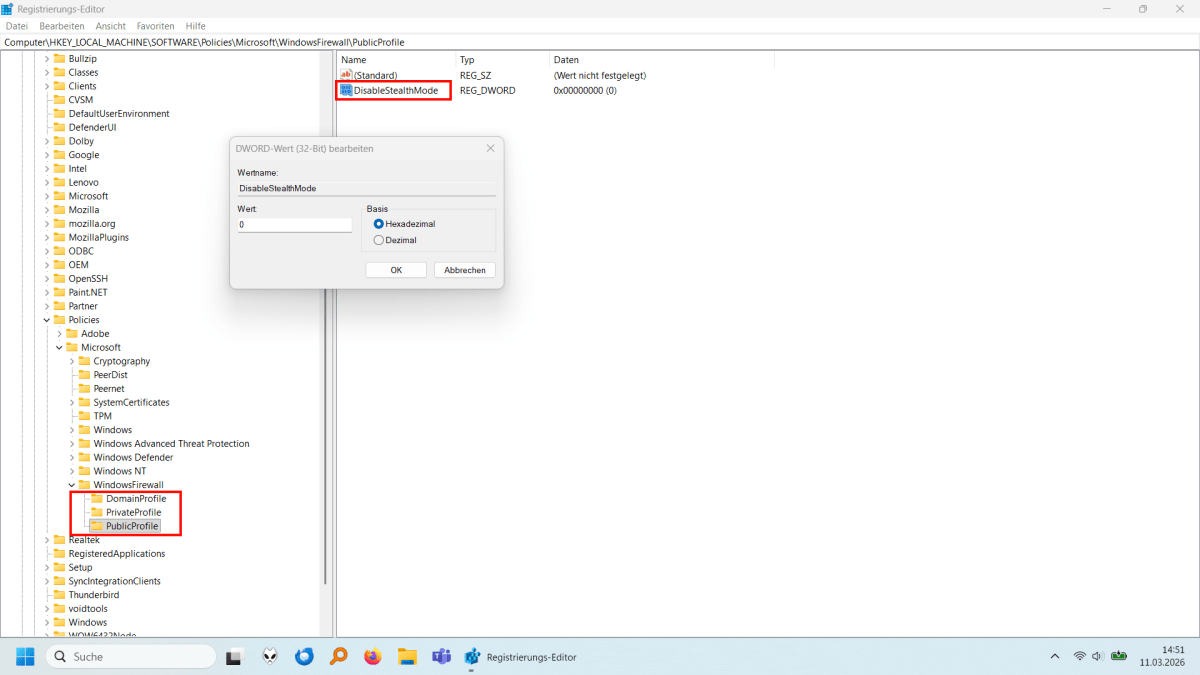
Forced invisibility: With the registry value DisableStealthMode = 0, you force the Windows Firewall’s stealth mode and prevent other programs from disabling it.
Steffen Zellfelder
If the WindowsFirewall subfolder is missing here, simply create it yourself by right-clicking on the Microsoft folder and selecting New > Key. Repeat this step within the new folder for the three subkeys DomainProfile, PrivateProfile, and PublicProfile. Ensure you use the exact spelling without spaces.
Now create a new DWORD value (32-bit) named DisableStealthMode in each of these three profile folders. Setting the value to 0 ensures that the firewall consistently applies Stealth Mode. While reachability via ping is primarily controlled via file and printer sharing, this adjustment provides additional hardening of the firewall configuration against unwanted deactivation.
Getting rid of legacy issues: Disable NetBios and LLMNR
It is also advisable to disable two obsolete but often still active protocols: NetBios and LLMNR. Both are used for name resolution on the local network and nowadays mostly serve only as a fallback when regular DNS resolution fails.
Attackers can exploit this vulnerability to impersonate legitimate network targets in so-called man-in-the-middle attacks and intercept login credentials. You can disable LLMNR in the registry under: HKEY_LOCAL_MACHINESOFTWAREPoliciesMicrosoftWindows NTDNSClient.
Goodbye, NetBIOS: Disable the outdated protocol in the WINS tab to prevent dangerous spoofing attacks on your login credentials on the local network.
Steffen Zellfelder
If the DNSClient key does not yet exist, create it by right-clicking. Then create a DWORD value (32-bit) named EnableMulticast and set it to 0. This will disable multicast-based name resolution via LLMNR.
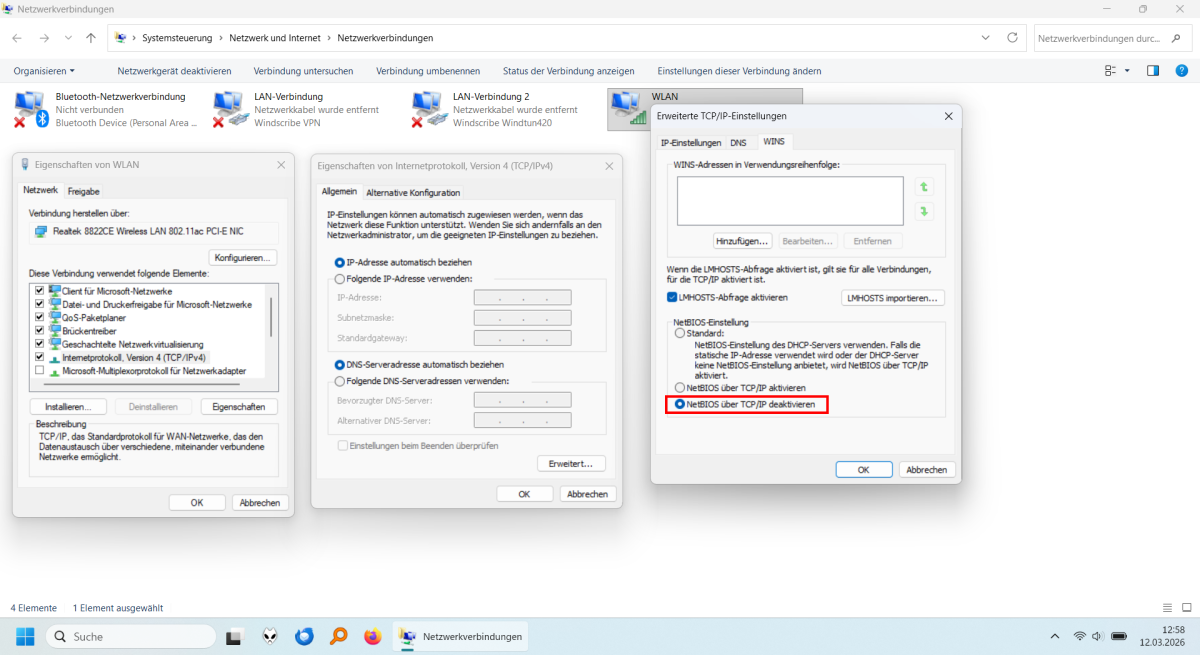
You can draw a final line under the NetBIOS era in the classic adapter settings. Press Windows+R, type ncpa.cpl and press Enter.
Right-click on your active adapter, select Properties and double-click to open the Internet Protocol Version 4 (TCP/IPv4) menu. Under Advanced > WINS, select the option Disable NetBIOS over TCP/IP. This closes one of the most dangerous loopholes for name resolution spoofing on the local network.
The open-door check: SMB and network shares
Often, you are no longer even aware of which folders you have shared on your home network over time. However, the SMB (Server Message Block) network protocol is a primary target for ransomware. You should therefore use the “net share” command in the Command Prompt (Start > type cmd > right-click: “Run as administrator”) to check which shares are active.
Pay particular attention to administrative shares such as C$ or ADMIN$. Although these can be temporarily disabled using net share [name] /delete, Windows automatically reactivates them on every restart. To prevent this permanently, you must create a new DWORD value named AutoShareWks in the registry under HKEY_LOCAL_MACHINESYSTEMCurrentControlSetServicesLanmanServerParameters and set it to 0.
Important: This step significantly improves security, but may restrict access for specialized backup software or remote maintenance tools on the local network. If you encounter problems with such programs after making this change, you can reverse the setting at any time by setting the value back to 1 or simply deleting the entry.
Conclusion
With a hardened firewall, encrypted DNS, and the deactivation of obsolete protocols, you can effectively secure your system. Your PC is significantly harder to detect on the network and only allows data through that you have explicitly authorized. Your digital defense line is thus built on a solid foundation.
This articles is written by : Nermeen Nabil Khear Abdelmalak
All rights reserved to : USAGOLDMIES . www.usagoldmines.com
You can Enjoy surfing our website categories and read more content in many fields you may like .
Why USAGoldMines ?
USAGoldMines is a comprehensive website offering the latest in financial, crypto, and technical news. With specialized sections for each category, it provides readers with up-to-date market insights, investment trends, and technological advancements, making it a valuable resource for investors and enthusiasts in the fast-paced financial world.